This classic French tart crust, pâte brisée is made with just 4 simple ingredients, and comes together easily by hand or in a food processor. Use this buttery, flaky crust for both savory and sweet tarts.
Let's make classic French pâte brisée using tools most home kitchens already have. You'll learn how to make the dough (savory or sweet), how to blind bake it, my best tips and how to make it ahead of time.
And do not worry if you don't have a tart pan or a pastry mat. A simple pie dish works perfectly, and the dough can be rolled out directly on the counter or parchment paper.
Jump to:
What is pâte brisée?
Pâte brisée (which tranlates to "broken pastry") is a classic French pasty dough made with flour, cold butter, salt and cold water. It is commonly used for tarts, quiches, galettes, pies. When baked, it becomes buttery and flaky, sturdy enough to hold a variety of fillings while still staying tender, crisp and easy to enjoy with a fork. It is essentially the French version of an American pie crust and belongs to the family of shortcrust-style pastries. Unlike Pâte sucrée, it contains little or no sugar, and no eggs, which makes it perfect for savory tarts like mushroom or tomato. But you can easily use it for sweet tarts as well.
Pâte brisée ingredients notes
See the recipe card for the ingredients quantities.
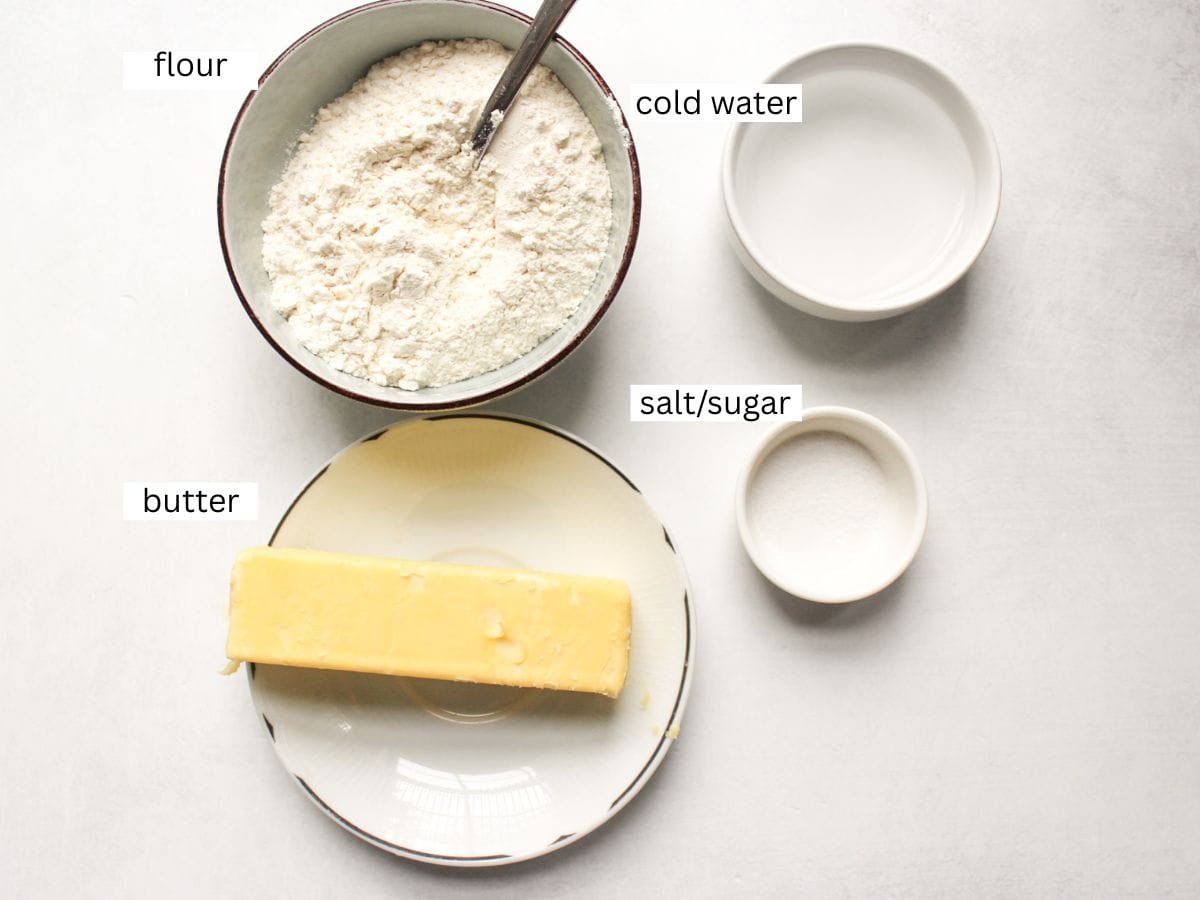
- Flour: all-purpose flour works perfectly for this tart crust, and gives it enough structure, while keeping it light and flaky. No need for specialty pastry flour.
- Salt: Salt balanced the taste of the dough. Add it even for making sweet tarts.
- Butter: Use cold, unsalted butter cut into small cubes. I prefer European-style butter, which has more fat. Cold butter is essential for flaky crust, it creates small steam pockets when it baked. If you have slated butters, simply skip the salt.
- Cold water: Before making the crust, I place the cup of water in the very back fridge to have it ice cold. Iced cold water will prevent the butter from melting.
- Sugar (optional): If you are making the crust for sweet fillings, add 1-2 tablespoons of sugar to the flour and salt mix.
Ingredient tip: If your kitchen is warm, chill the butter cubes in the freezer for 10 minutes.
How to make Pâte brisée crust
This tart crust recipe comes together in just a few simple steps: making the dough, chilling it and blind baking to a perfectly flaky shell.
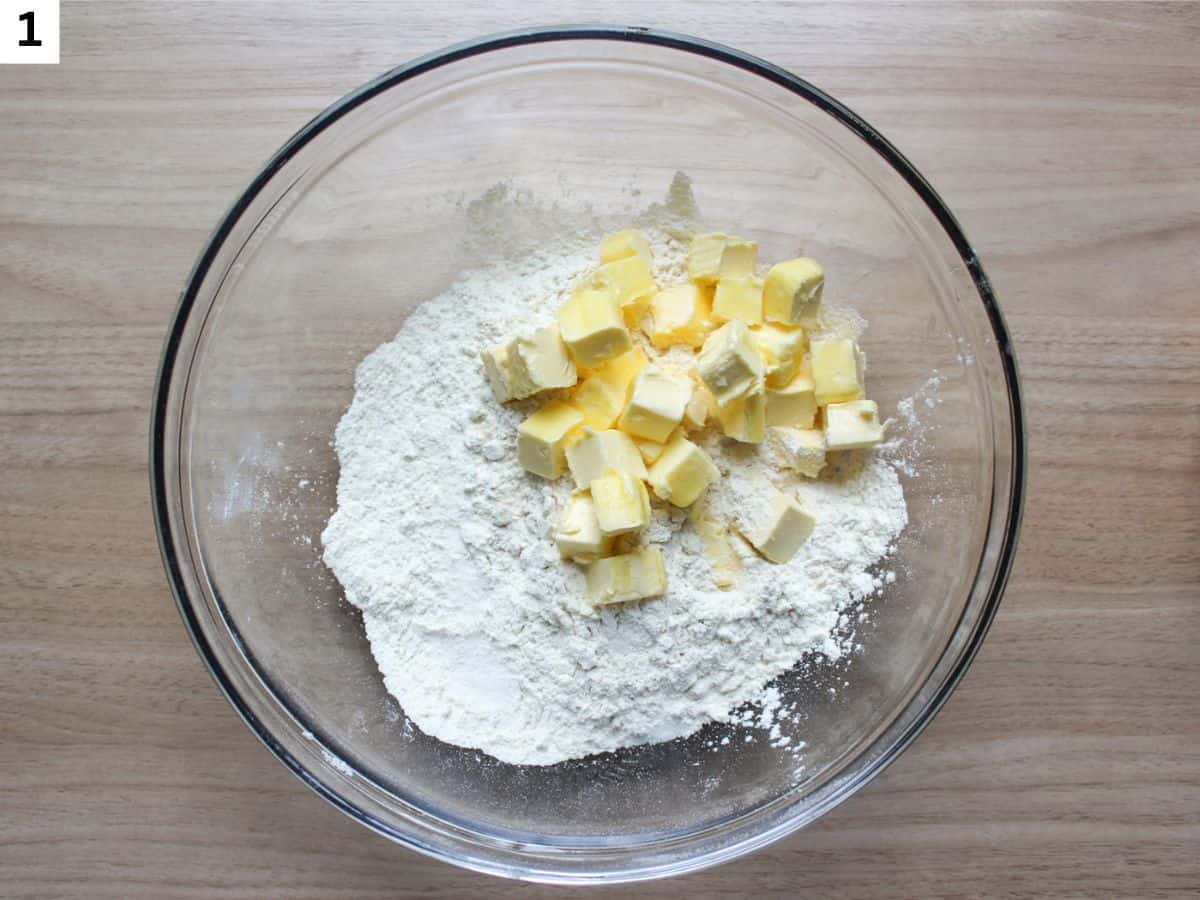
1.Combine butter and flour. In a large bowl, combine flour, salt and sugar (if making the sweet crust). Whisk until evenly distributed. Add Cold cubed butter to the flour mixture.
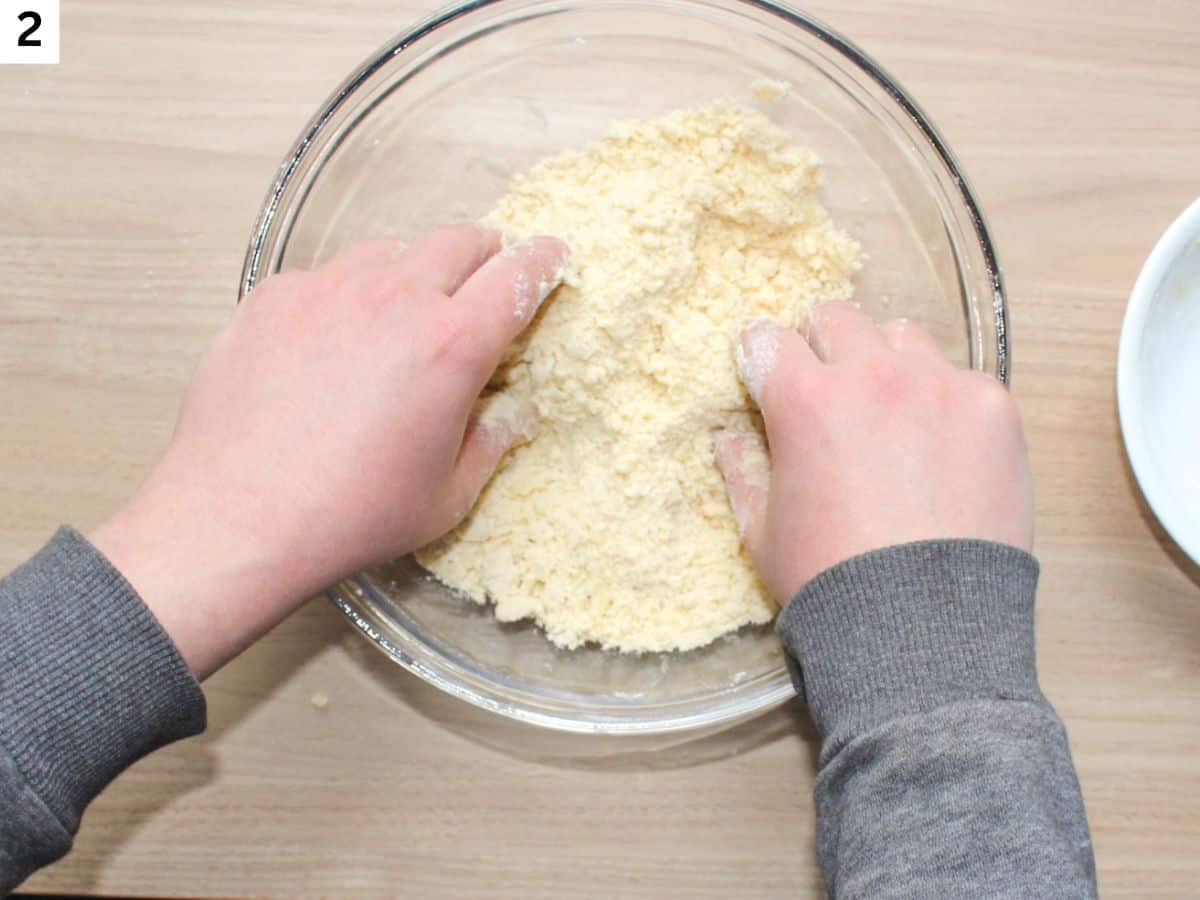
2. Rub the butter into flour. Using your fingers, rub the butter into the flour until the mixture looks like coarse crumbs with the pea-sized pieces of butter. A few larger lumps are ok.
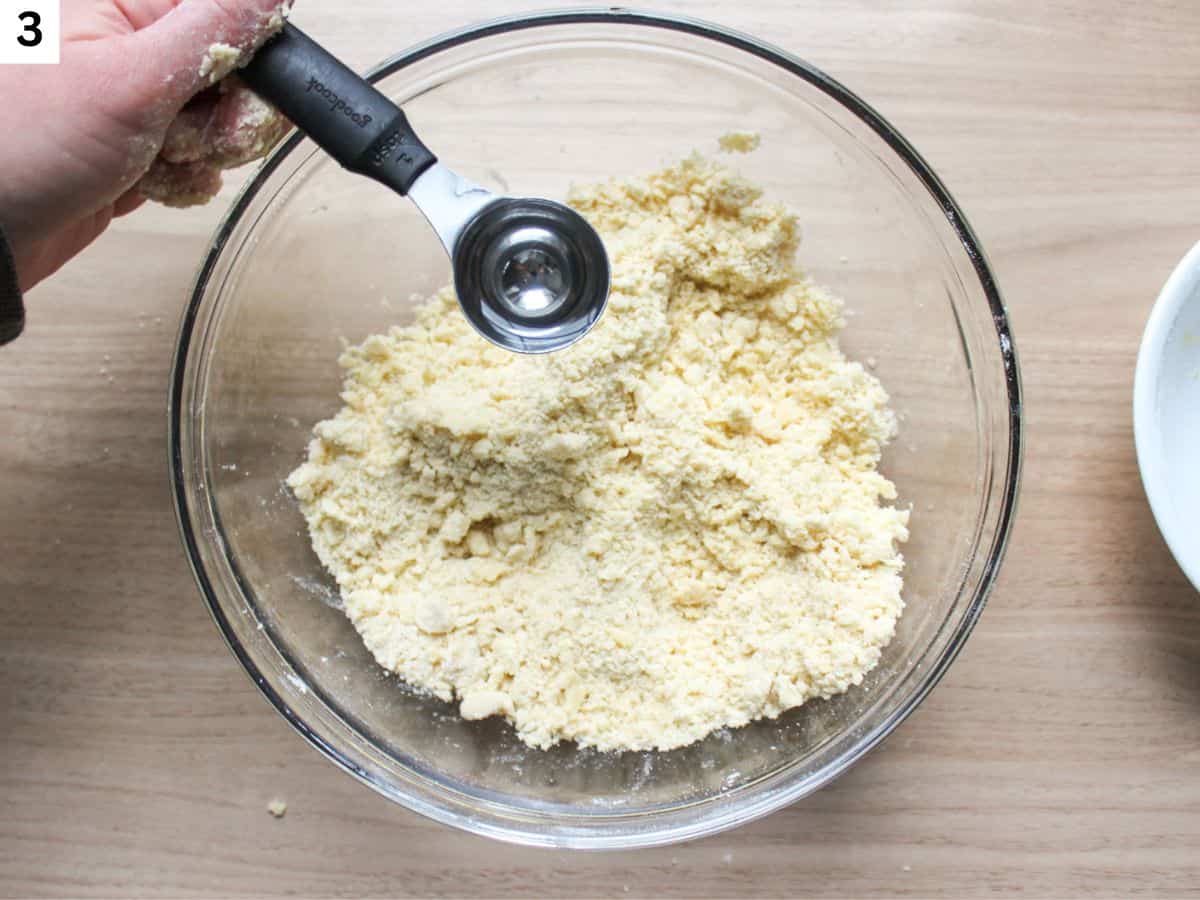
3. Add cold water. Starts adding cold water, 1 tablespoon at a time, gently mixing it with hands. Once the dough comes together when pressed, stop adding the water. You will need about 1-3 tablespoons.
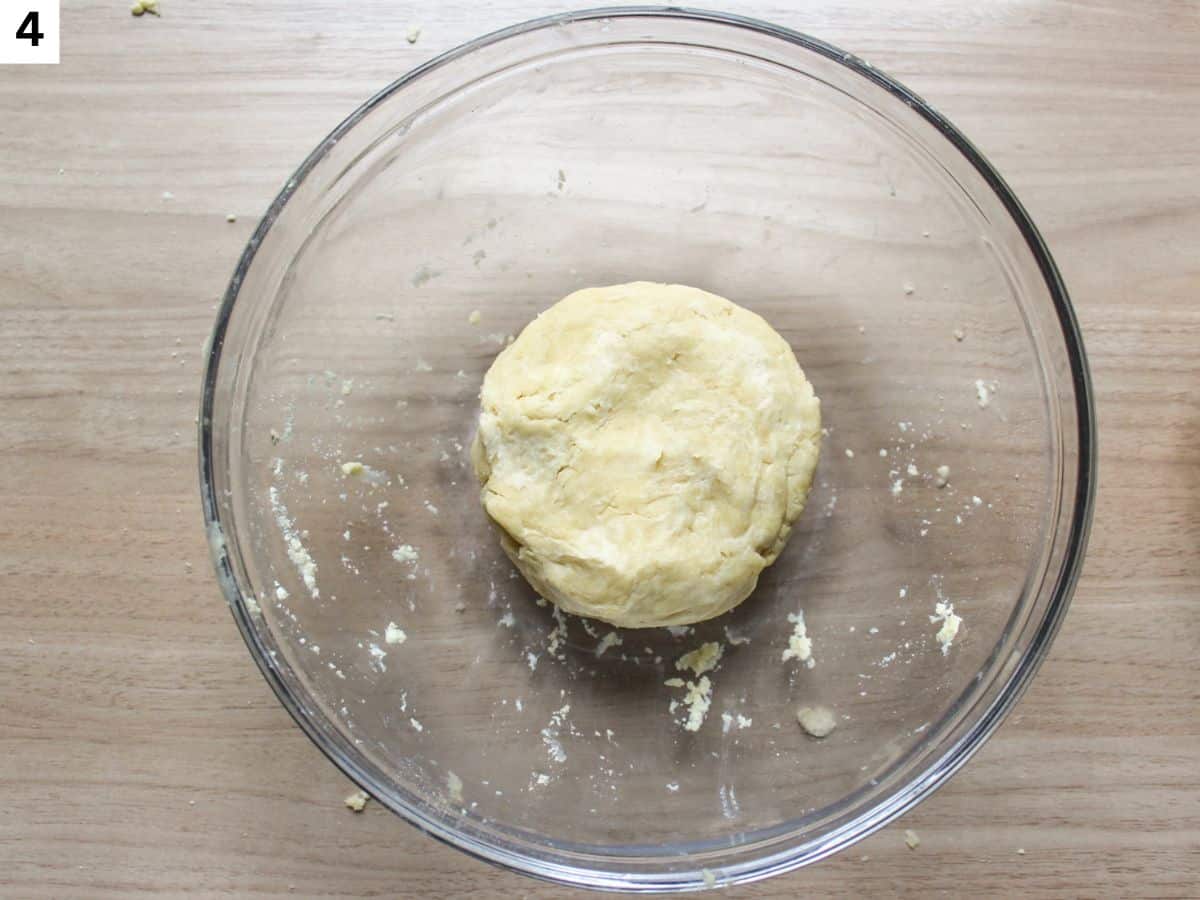
4. Form the dough. Gently knead it until you can bring it into a ball. The dough should hold together, but it still gonna look a little shaggy.
Note: Do not over knead it, because the gluten will develop and the texture will be tough.
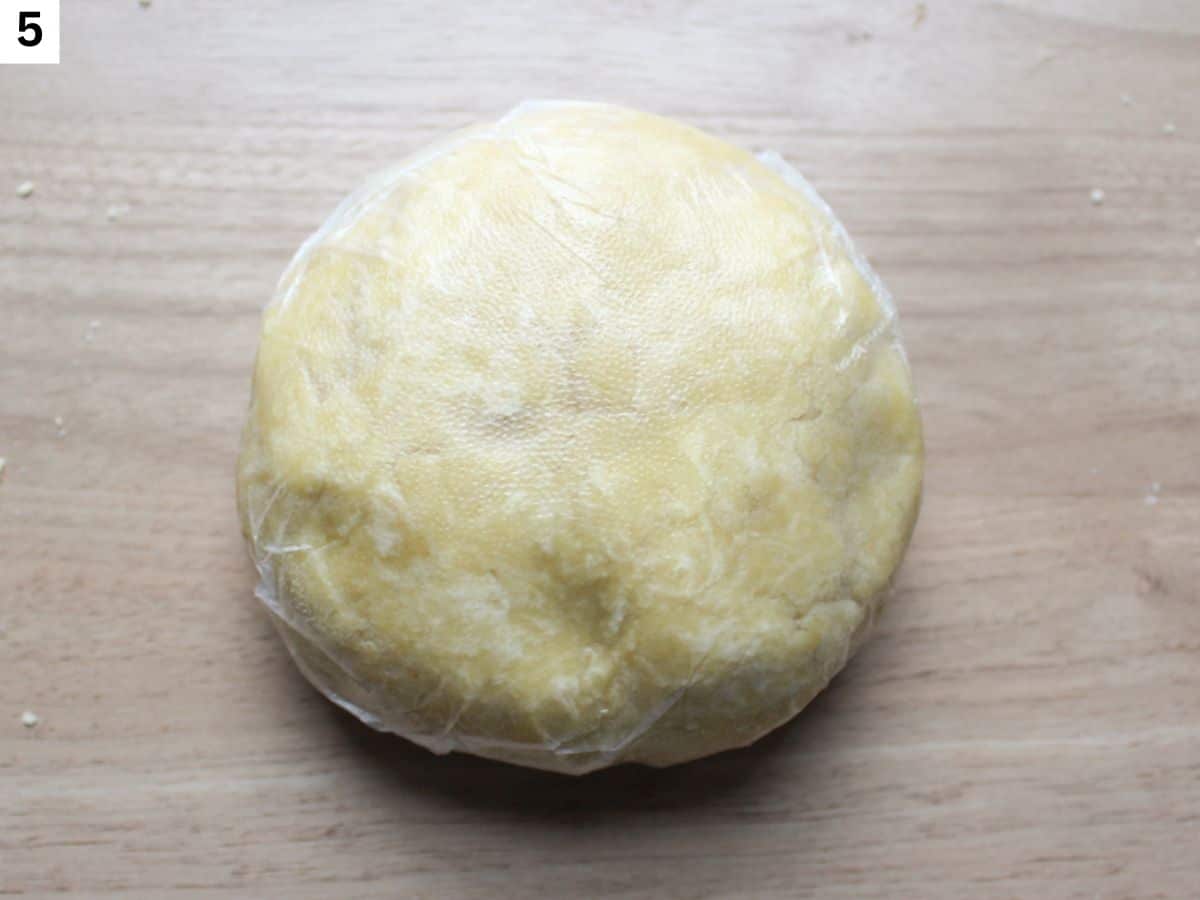
5. Wrap and chill. Form the dough into a disk. Wrap into the plastic wrap and place in it in the fridge for at least 30 minutes.
Why shaping it in a disk is better than a ball? The disk makes it easier to roll the cold dough and allows it to chill evenly. This shape also limits the air contact when wrapped.
Do not want to use plastic? If you prefer not to use plastic wrap, you can also wrap the dough in parchment paper. Before plastic wrap became a thing, they used wax paper or kitchen linen to wrap the dough.

6. Roll out the dough. Lightly flour the flat surface with flour or roll the dough between two sheets of parchment paper. Start rolling the cold dough from the center, applying gentle pressure and rolling outward to form a circle. Rotate the dough frequency to keep the shape even. It should be slightly larger than your pan and about about ⅛ inch thick, or roughly the thickness of a coin.
Tip: If the dough becomes too sticky and starts tearing, it means it got too warm. Place it back in the fridge for 15 minutes, before continuing.
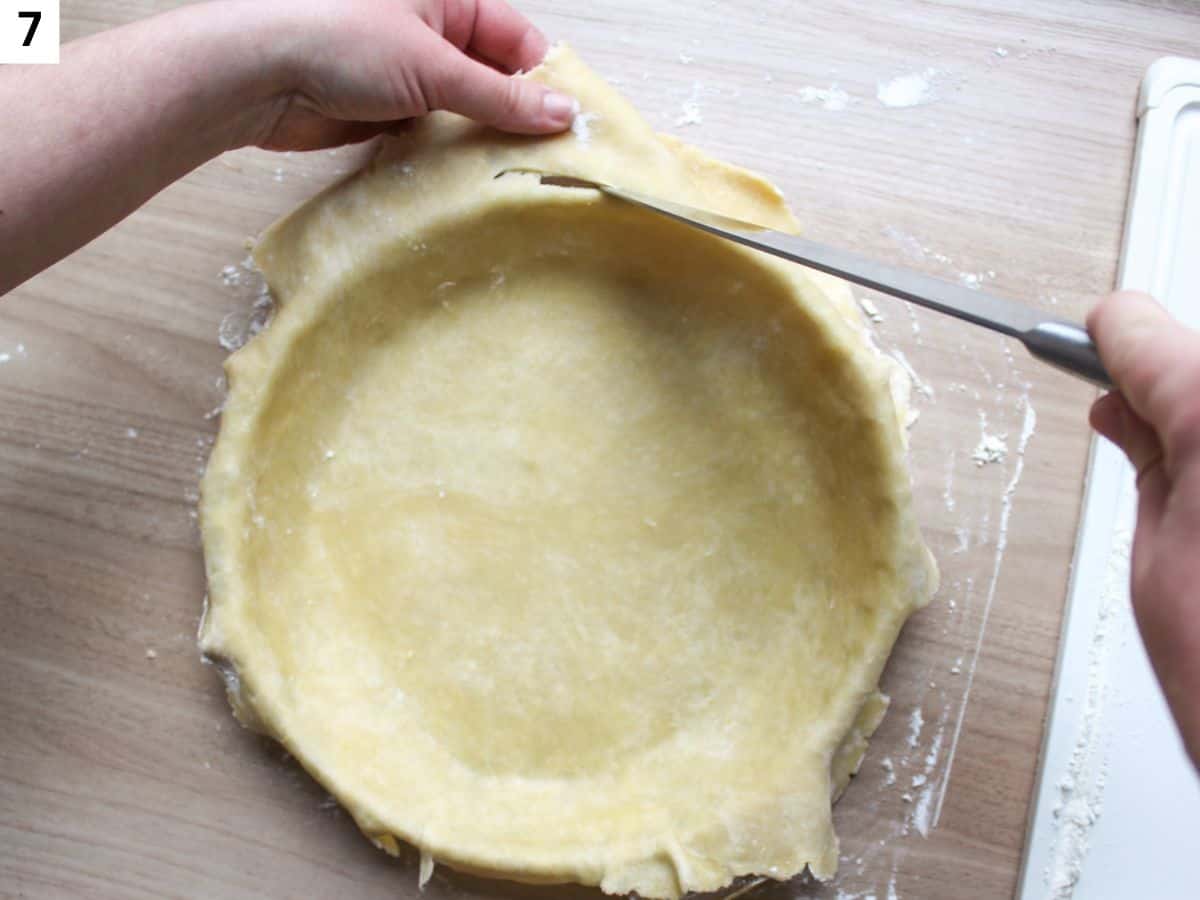
7. Transfer the dough into the pan and trim it. Carefully, wrap the rolled dough onto the rolling pin and transfer it onto a greased 9-inch round pan. Unroll in on to the pan. Gently press it into the bottom and sides. Follow the shape of the pan without stretching the dough.
Trim any excess dough with a knife, or fold it under to create thicker edges. If you are baking it in a tart tin, you can use a rolling pin to trim it by rolling it over the tart.
Tip: If the dough tears slightly while transferring, simply press the dough back together or path it with extra dough Don't worry if the dough tears while transferring it to the pan.
Tip: For decorative edge, you can gently press the dough with your fingers.
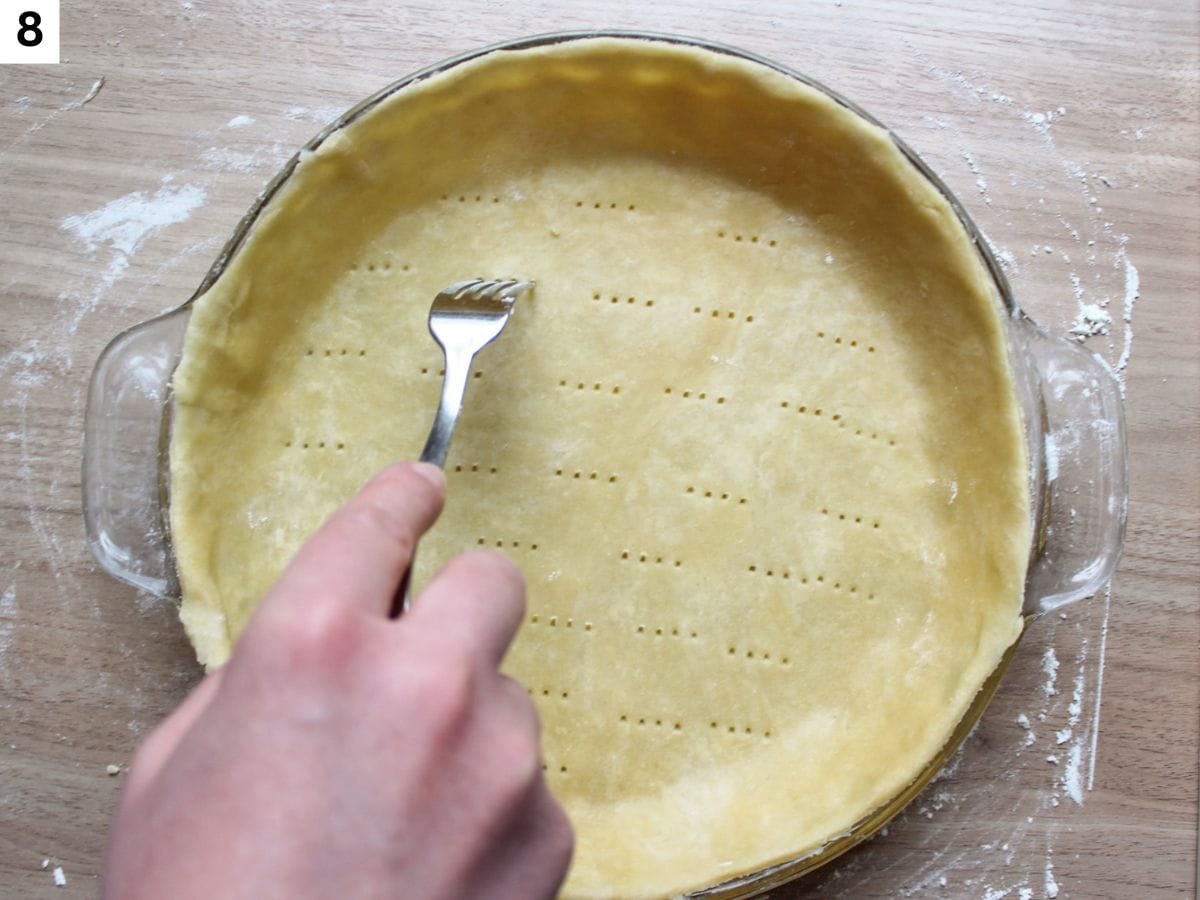
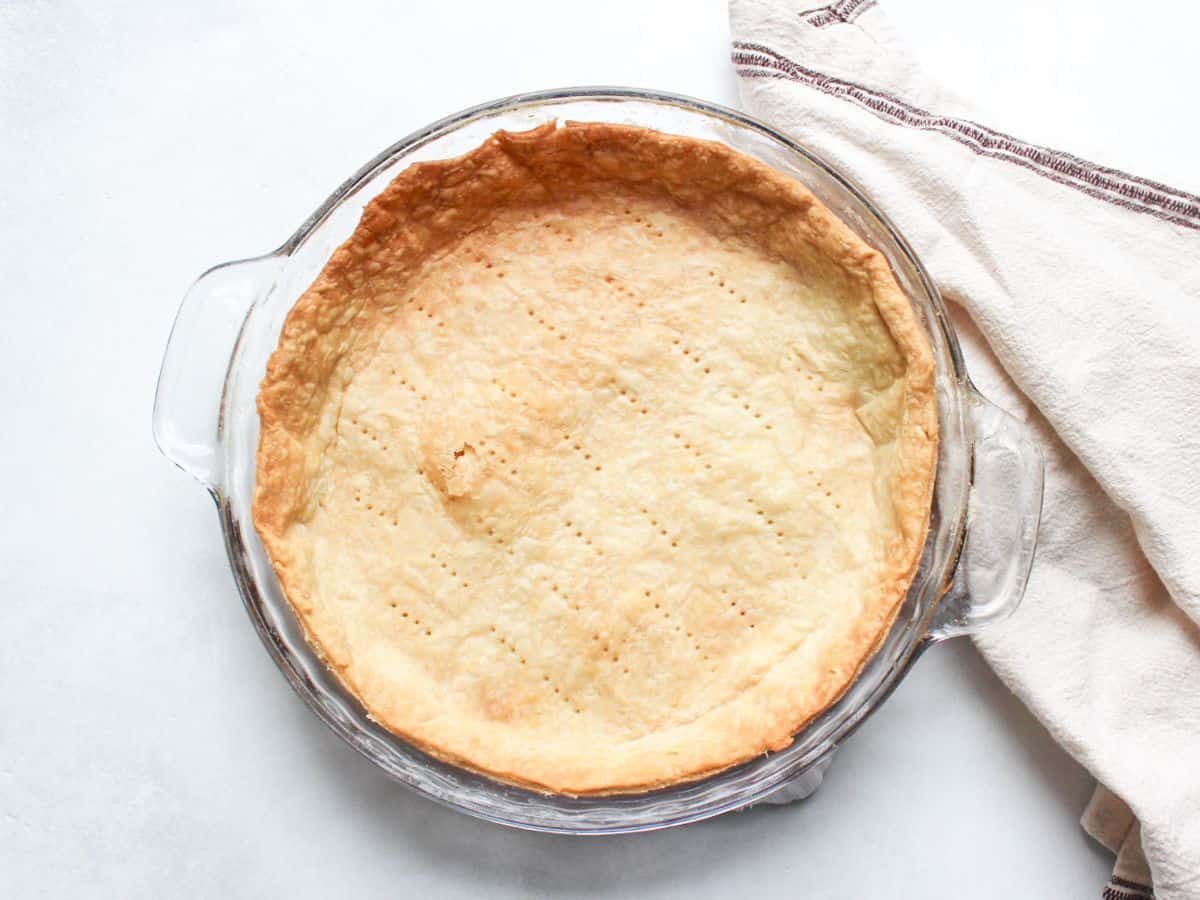
8. Dock the crust and chill the crust: Prick the bottom of the crust with a fork, about 15-20 times across the surface of the crust bottom to prevent it from puffing.
Place it back into the fridge for 30 minutes before baking.
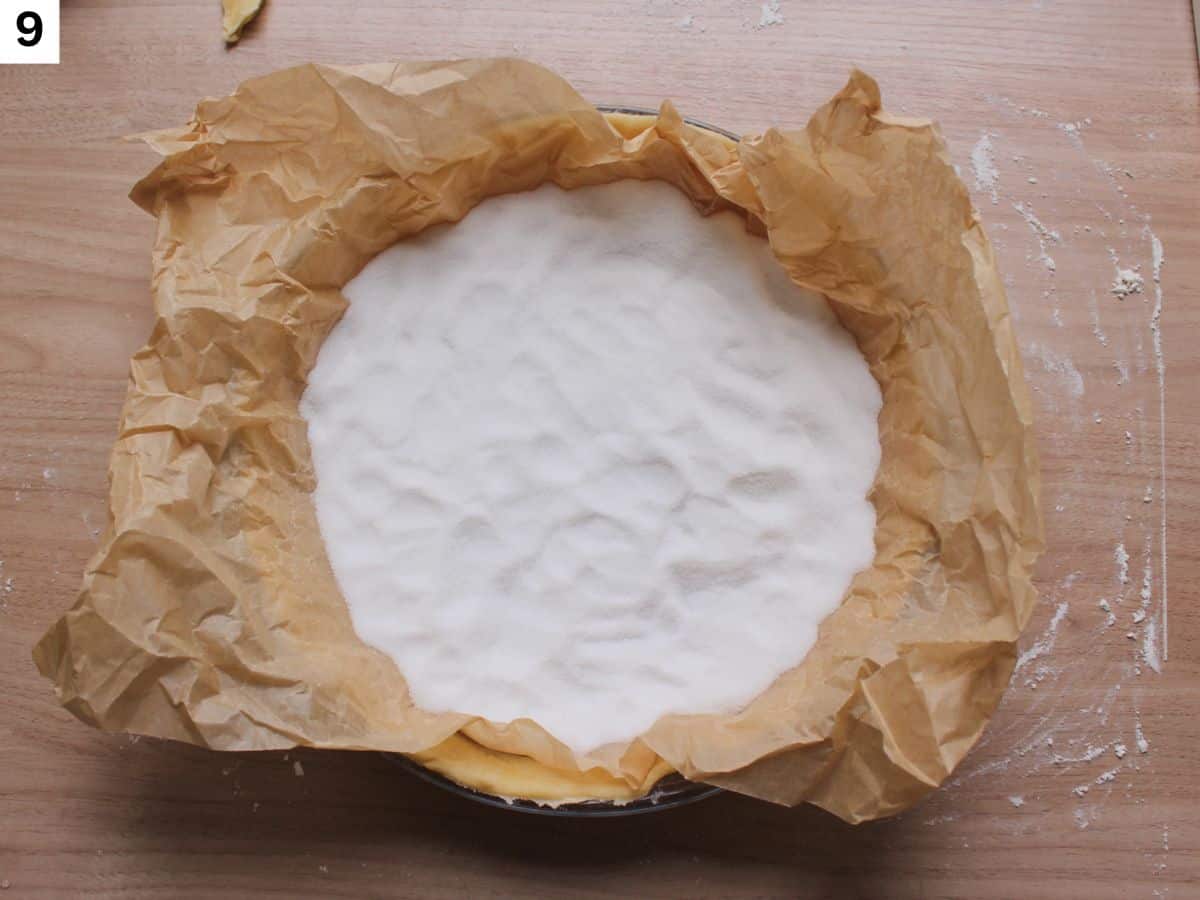
9. Add the pie weights: Place a sheet of parchment paper over the crust. Fill it with pie weights, beans, rice or sugar. Sugar works very well, you can also use it later for baking.
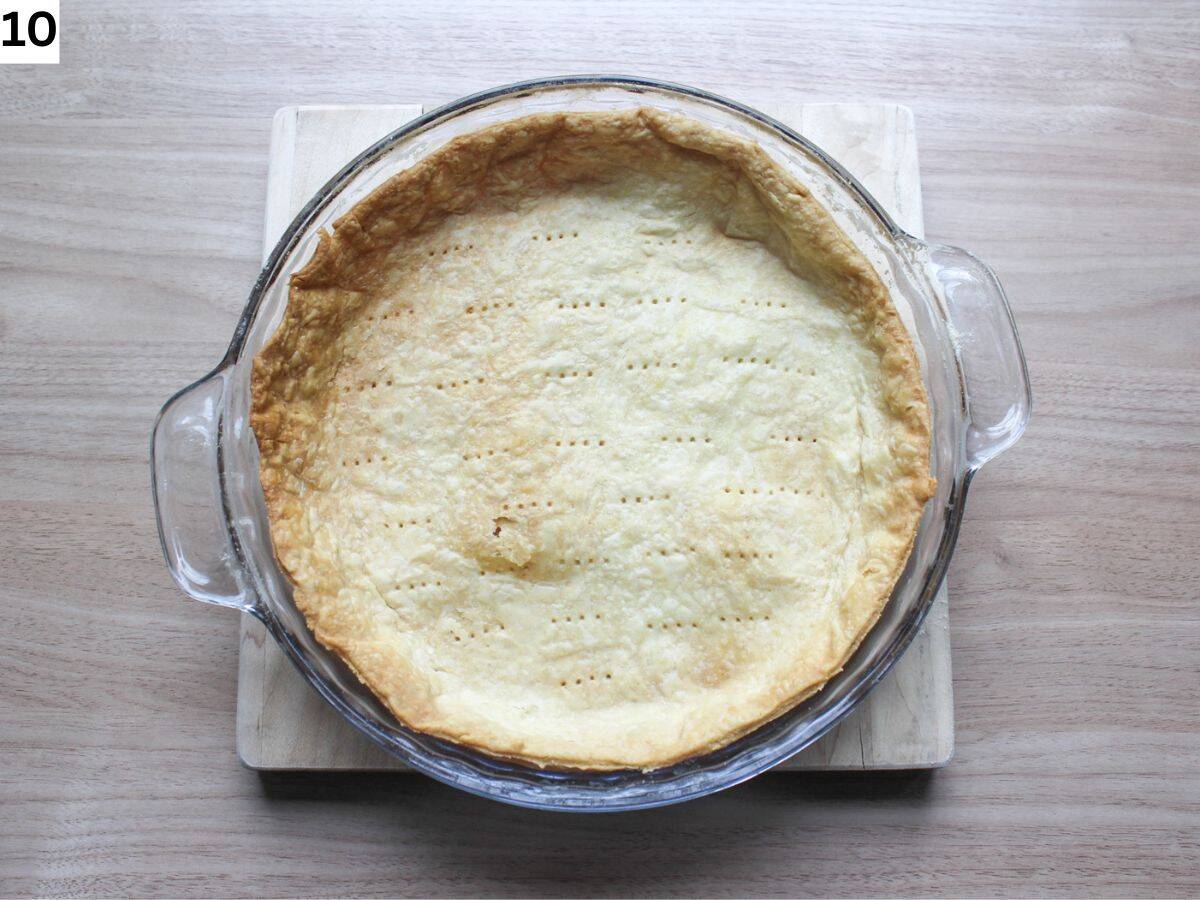
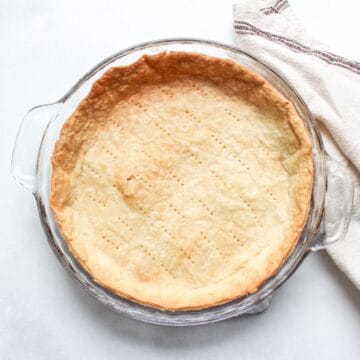
10. Blind bake: Bake the crust at 350℉ for about 30 minutes.
For no-bake fillings: Bake at 350℉for 20 minutes, remove the parchment paper with the weights. Bake for another 10 minutes or until golden brown and fully cooked. Let the crust fully cool down before adding the filling.
For baked fillings: Bake at 350℉ for 20 minutes, remove the parchment paper and bake for another 5 minutes until the edges are slightly golden.
Pour your prepared filling and bake for another 20-25 minutes, depending on your filling ingredients.
When your tart fillings needs to be baked, you can blind bake first or bake everything together. For pâte brisée, I like blind baking it first, to prevent the soggy crust bottom.
Note: all the ovens are different and you may need more or less time. Closely watch the edges once you remove the parchment paper.
How to prevent the crust from shrinking
If you ever baked the tart crust and noticed that it slightly shrunk after baking, it is completely normal. But you can follow a few tips to prevent it from shrinking to much:
- Do not stretch the dough when placing it into the pan. This recipe yields just the right amount for 9-inch (24 cm) round pan, giving you a room for tall pie-style edges without the need to stretch it the dough.
- Chill the crust after shaping it in the pan in the fridge for 30 minutes before baking. The butter will firm up and it helps the dough keep its shape in the oven.
- Do not overwork the dough and mix it just until it comes together. Too much mixing develops gluten, which can cause thee crust to shrink.
- Blind bake the crust. Baking it with weights helps keeping the crust in shape and prevents it from shrinking. You can use pie weights, dry rice, dry beans or even granulated sugar.
Make-ahead storage for baked crust
Room temperature: Let baked crust fully cool down. Store it in an air-tight container for up to 2 days.
- Refrigerator: Airtight container or a large Ziploc bag for up to 5 days.
- Freezer: Wrap it tightly in plastic wrap and store in the freezer for up to 2 months. Thaw it in the fridge before adding the filling.
- Pro tip: You can bind bake multiple crusts in one day and freeze them individual for later. I often for this before holidays, it saves so much time.
Make-ahead storage for the dough
The prepared dough stores very well in the fridge or a freezer.
- Refrigerator: Wrap it tightly in plastic wrap and store it in the fridge for up to 3 days.
- Freezer: Wrap the disk rightly in plastic wrap and place it in a freezer-safe bag. Store it in the freezer for up to 2 months. Thaw it overnight in the fridge overnight.
Useful tip: if the chilled dough cracks when rolling it, let it rest at room temperature for 10 minutes. Cold butter can make the dough firm.
Can I make the dough in a food processor?
Yes, you can prepare the dough using a food processor. Add flour, salt, sugar (if using) and cubed butter to the food processor. Pulse on medium until you have a coarse crumb. Drizzle water, 1 tablespoon at a time and pulse again until the dough comes together. Transfer on a flat surface, briefly knead it until you can form a disk. Wrap in a plastic wrap and chill in the fridge for 30 minutes.
More European recipes
📖 Recipe
Classic French Tart Crust (Pâte Brisée)
Equipment
- kitchen scale
- measuring spoons
- 1 9-inch (24cm) tart or pie pan
- 1 sheet parchment paper
- ceramic pie weights, dry beans, rice or sugar
Ingredients
- 175 grams (1½cup plus 1 tablespoon) all-purpose flour
- ¼ teaspoons salt
- 113 grams cold butter
- 2-3 tablespoons (30-45 milliliters) iced cold water
Instructions
- Prepare the pan. Slightly grease 9-inch round tart or pie pan with butter to prevent it from sticking.
- Mix dry ingredients. In a large bowl, combine flour, salt and sugar. Whisk to distribute evenly.
- Add butter. Add cold butter cubes (½-1inch) to the dry ingredients. Using your fingers, rub the butter into the flour until it resembles a coarse crumb. Aim for the pea-size butter pieces. A few lumps is OK.
- Add water. Gradually add cold water, 1 tablespoon at a time, until the dough just comes together. You may need less or more water, but should not be more than 3 tablespoons. Carefully knead the dough just until you can bring it into a ball. It should still look shaggy.
- Form the disk and chill the dough. Form the dough into a disk, wrap in plastic, and refrigerate for at least 30 minutes. The dough can be stored in the fridge for up to 3 days or frozen for up to 2 months.
- Roll out the dough. Place the dough between two sheets of paper or on a floured flat surface. Roll it into thin circle (about ⅛ inch), larger than your baking pan.
- Transfer to the pan. Lift the dough and transfer it into a slightly greased 9-inch round pan. Press into the bottom and sides without stretching. Trim excess.
- Dock the tart with a fork. Prick the bottom lightly with a fork. Do not make holes.
- Chill the tart. Chill the tart in the fridge for 30 minutes.
- Blind bake the crust. Preheat oven to 350℉. Line the baking sheet over the crust. Fill with pie weights, dry beans, rice or sugar. For non-baked fillings: Bake at 350℉ 20 minutes, remove weights and parchment, then bake another 10 minutes until lightly golden. Cool before adding filling.For baked fillings: Bake at 350℉ for 20 minutes, remove the parchment paper and bake for another 5 minutes until the edges are slightly golden. Add the filling and bake for another 20-25 minutes.


Comments
No Comments