
Learn how to cut a whole chicken into 10 pieces to save money, have better meat quality, get extra for the homemade stock and minimize the food waste. All you need is a whole chicken, boning knife and a cutting board.
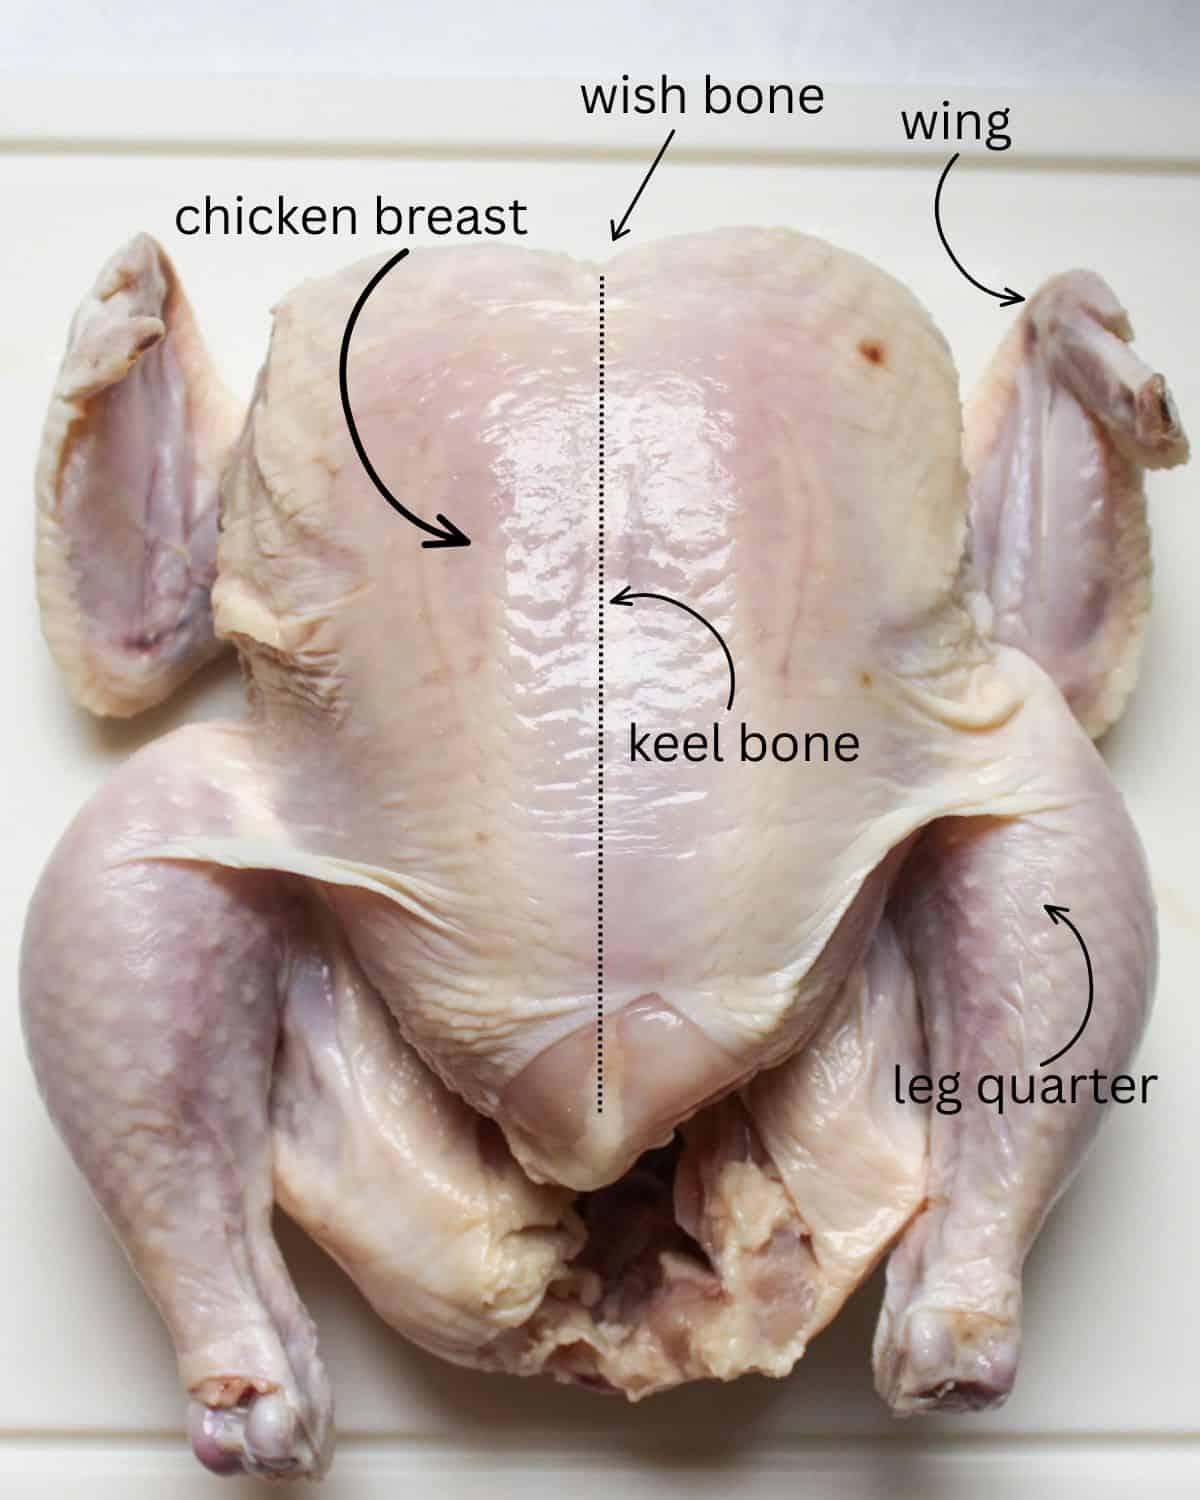
Did you know that buying a whole chicken is significantly cheaper per pound than buying packaged cuts? Besides saving money, the biggest difference is meat quality. Whole birds sold in grocery stores are usually young "fryer" chickens, which means the meat is naturally tender. Compared to those huge, pre-packaged breasts that can turn tough and woody when cooked. Fresh whole-bird breasts are tender, juicy, and taste much better in your favorite recipes.
So, whenever I need chicken breasts for dinner, I buy a whole bird and butcher it myself. I cook the breasts right away (or any part I need that day), then freeze the thighs, legs, wings, and carcass separately. After a few weeks (or by breaking down 3 or 4 birds in one prep session), I have a freezer stocked with custom cuts for less dollars. By the way, most pre-packaged store cuts were previously frozen anyway! By cutting a whole chicken, you will have 10 fresh chicken pieces plus the carcass for the stock: 2 wings, 2 drumsticks, 2 thighs, 2 breasts and 2 tenderloins.
I have been buying and cutting whole chickens at home for years, but I recently took my official practical exam on poultry fabrication at culinary school! Passing that test inspired me to combine my years of home butchery experience with the precise, chef-level techniques I just learned in class. In this guide, I'm sharing my favorite step-by-step breakdown methods, including a few culinary school tips that make cutting a whole bird easier, cleaner, and more efficient than ever.
If you have realized that you'd rather cook a whole bird today instead of cutting it, check out my delicious recipes: air fryer whole chicken, roasted chicken in oven bag, spatchcock chicken, whole chicken in Dutch oven or boiled whole chicken.
Jump to:
What you will need
These is all you need to butcher a whole chicken at home.
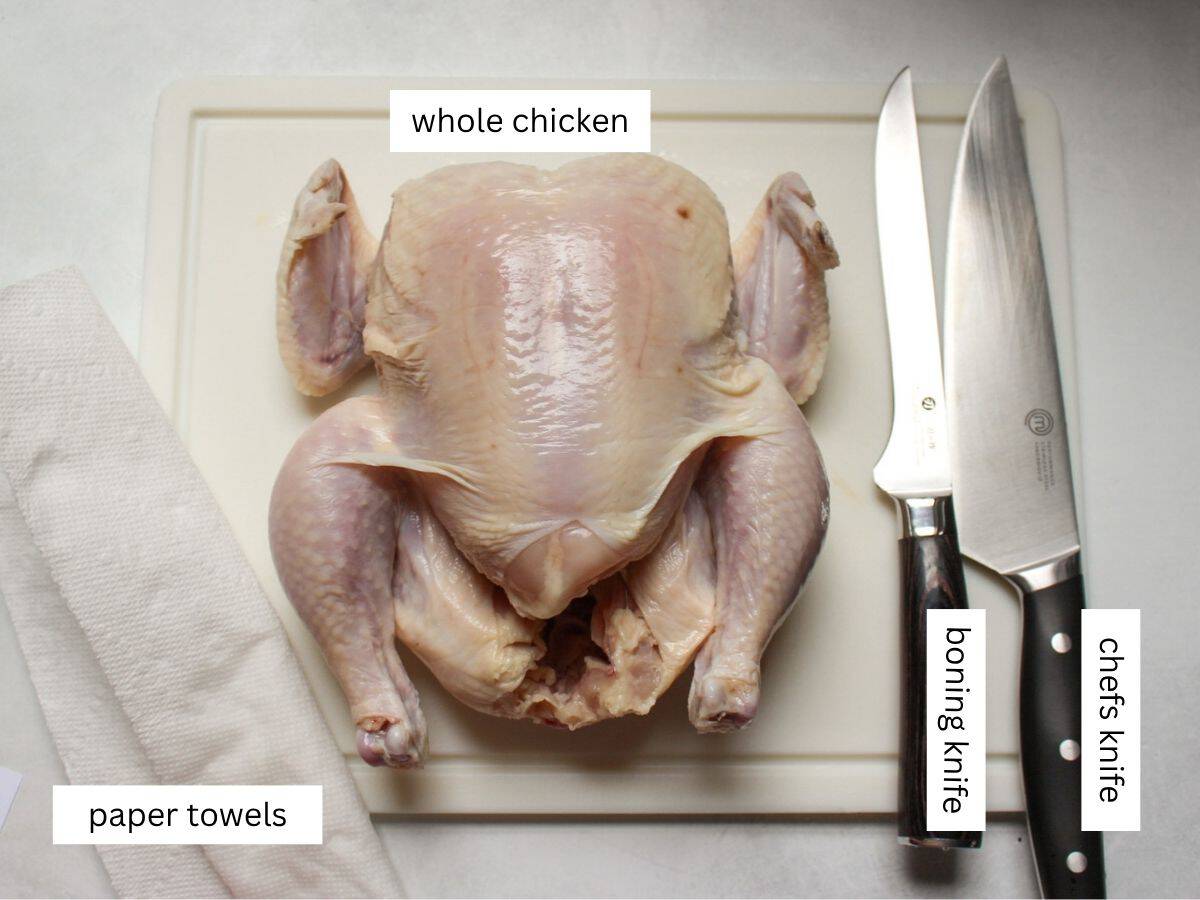
- A whole chicken: Standard store-bought chickens are usually "frying chickens," which are young birds weighing 3 to 4 pounds and perfect for any recipe. Farmers market or home-raised chickens work great too.
- Knifes: Ideally, you will need boning knife and chef's knife. Boning knife is great for tracing close to bones, removing skin, tissue. The flexible blade lets you maneuver around the bones and juices without leaving any meat behind. Chef's knife is great for cutting through the joints, splitting the backbone and dicing the meat. You can also use the poultry shears.
- Cutting board: You will need non-porous plastic or even stainless-steel cutting board. Avoid using the wooden cutting board, as it will be harder to clean.
- Paper towels: to dry the chicken. I also like to place a few damp paper towels under my cutting board so it does not move.
- Freezer-safe bags or containers: If you are planning to freeze some chicken parts, do not forget about freezer-safe bags or containers and some sharpie to mark the dates and content.
How to cut the whole chicken
Below are the detailed step-by-step directions on how to cut the chicken. I will also show you how to French the bone and keep it attached to the chicken breast. Most of professional kitchens do it for the most aesthetic look, and it is just a cool thing to know how to do.
Check the cavity for gizzards and neck
Check the chicken cavity and if yours has a small bag inside, pull it out. Some whole chickens might have giblets. Save the neck, heart, stomach alongside the carcass for making the stock. As for liver, you can sauté those with onions or make a chicken liver pate.
Dry the chicken
Pat dry the chicken with paper towels. It is important so it does not slip, while you are cutting it.
Remove the wishbone and wings (choose your style)
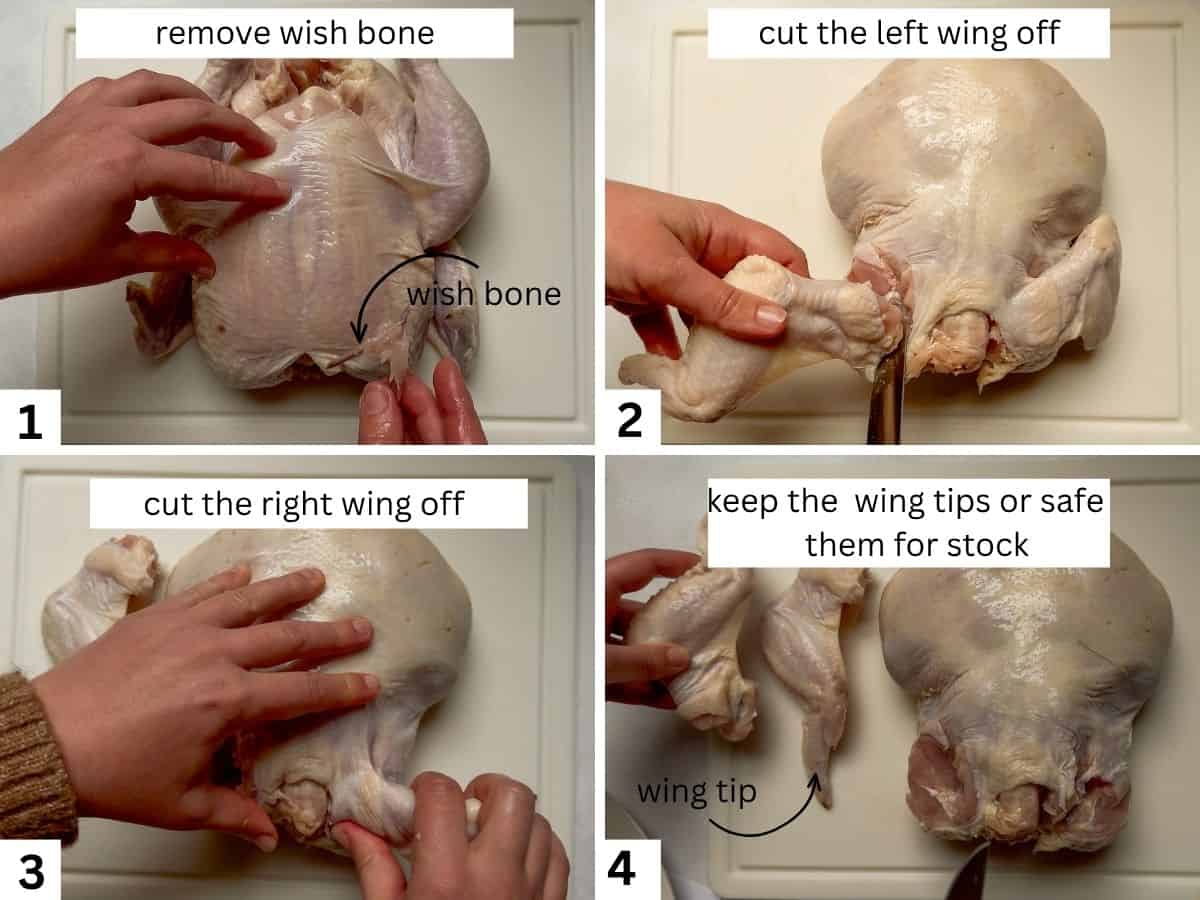
Place the chicken breast-side up on your cutting board with the neck cavity facing you. At the top neck opening, feel for the small V-shaped wishbone just under the skin. Make two cuts along both sides of the bone with the tip of your boning knife, gently wiggle it using your hand, and pull that bone out (image 1). Now, it will be easier to separate two breasts.
Pull one wing away from the body. You can cut it two ways: A. the classic way with having 3 pieces of the wings (tip, drummete, and wingette) or you can make it B. Airline Breast Style, when you leave the drummete attached to the chicken breast. This technique is often used for elegant look.
Option A.Regular wing (images 2,3,4). Pull one wing away from the body to stretch the skin tight. Cut through the skin into the shoulder joint. Bend the wing back until you feel or hear the ball joint pop out of its socket, then slice through the soft cartilage to release it. Cut through the shoulder joint completely, freeing the whole wing from the body. You can trim off the small wing tip and save it for chicken stock.
Option B. Airline Breast Style (image B, at the end of the post). Pull one wing away from the body to stretch the skin tight. Using your knife slice the skin slightly above the joint that connect wingette and drumette. Pop the joint and cut it though. Leave the drumette bone attached to the breast! You can scrape the meat off the top end of that bone (Frenching) for an elegant, restaurant-style aesthetic look when roasted.
Tip: Not sure what recipe would be great for using the frenched chicken breast? Try making my chicken Kiev cutlets. Those will be perfect with the wing bone attached for elegant presentation.
Remove the legs and thighs (do not miss the oyster)
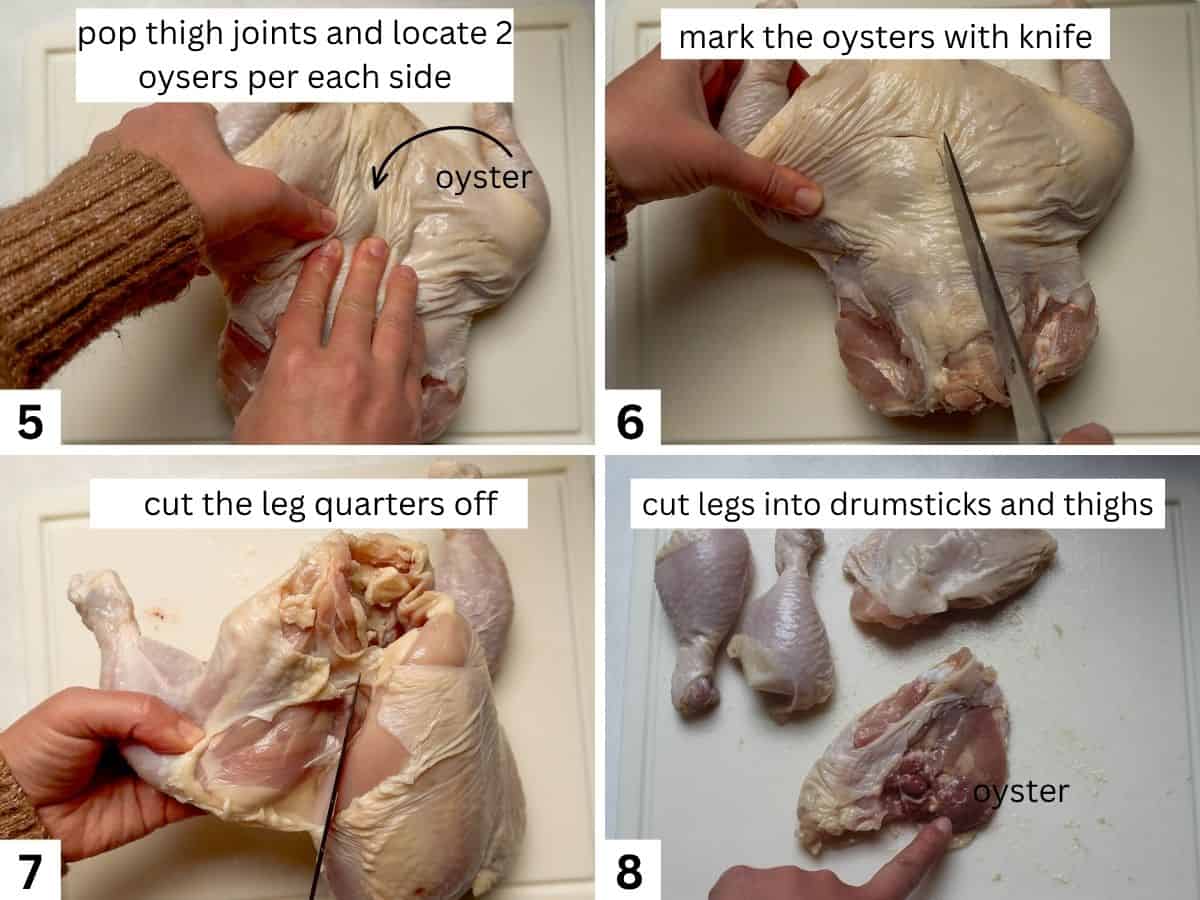
Pull one leg away from the body and cut though the lose skin connecting the thigh to the breast. Bend the leg all the way back until the thigh bone pops out of its hip socket. Important step next! As soon as you pop the hip all the way back, look right near the top of the hip joint along the backbone, you will see a small, tender round piece of dark meat bulging out, that is your oyster! (image 5). Use the tip of your knife to gently trace and mark a line around it right away (image 6). Then, sweep your blade deep along the curvature of the bone so that juicy oyster stays attached to the thigh piece rather than remaining stuck on the carcass. Cut through the remaining skin and connective tissue to free the leg and thigh in one piece. Repeat with the second leg (images 7,8).
Remove the breasts and tenderloins
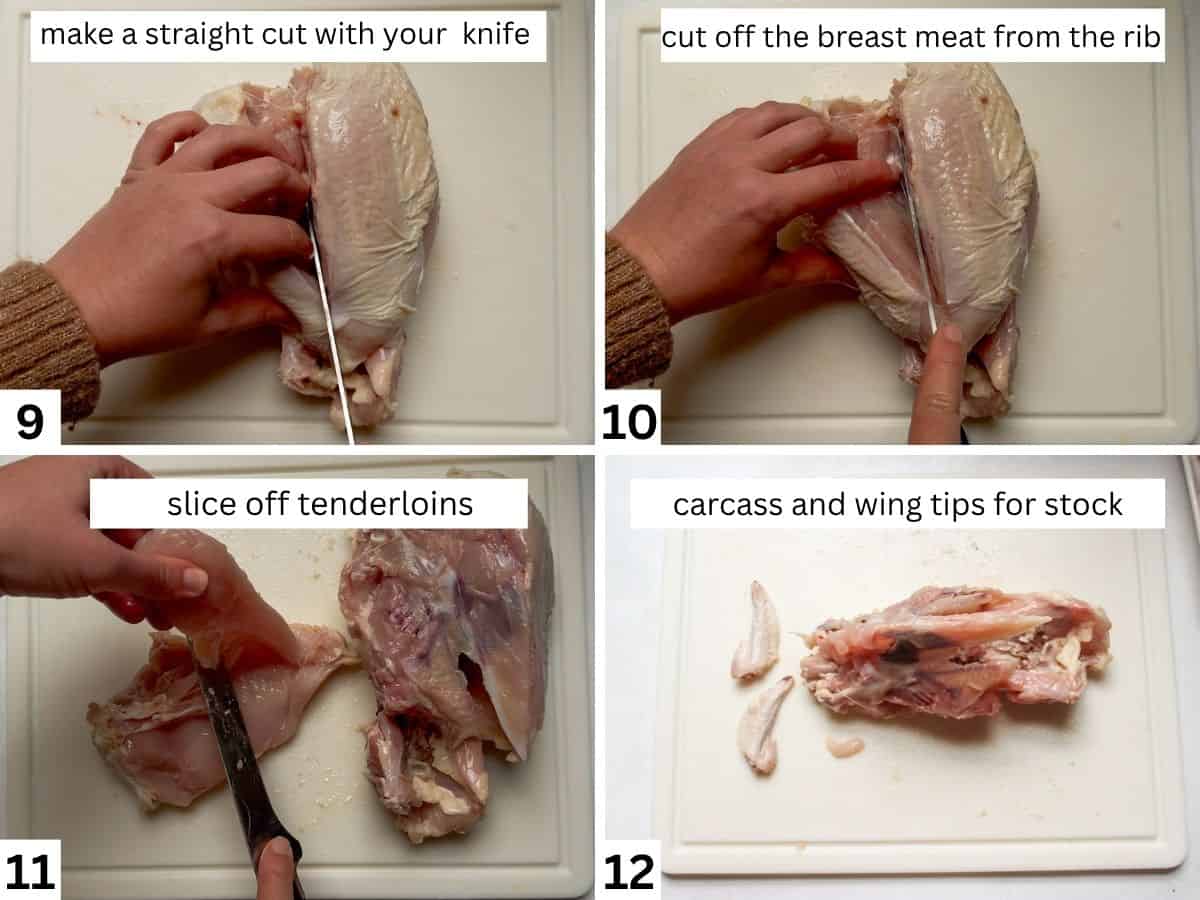
With the chicken sitting breast-side up, locate the center line of white cartilage running down the breast, the keel bone. Make a straight cut with your boning knife down one side of the keel bone, staying as close to the bone as possible (image 9). Using short, sweeping strokes with the tip of your boning knife, angle the blade against the rib cage. Smoothly peel the breast meat away from the ribs, moving from top to bottom until the entire breast half is free (image 10). Repeat on the second side. Remove the tenderloins. Turn each breast upside down. On the underside, you will see a small, loose strip of lean meat, this is the chicken tenderloin (image 11). Since tenderloins fall off during cooking, gently slice them away from the main breast half.
Practical tip: Once you remove the breast halves and tenderloins, you can cook them immediately or freeze them in individual portions for quick weeknight dinners. When you are ready to cook them straight from the freezer (sometimes we forget to thaw them), use my reader-favorite recipe for air fryer frozen chicken breasts to get juicy, tender results in under 15 minutes without thawing.
What pieces you will have
Here are your 10 pieces laid out, whether you choose the standard cut (image A) or french the chicken breast with the wing bone attached (image B).
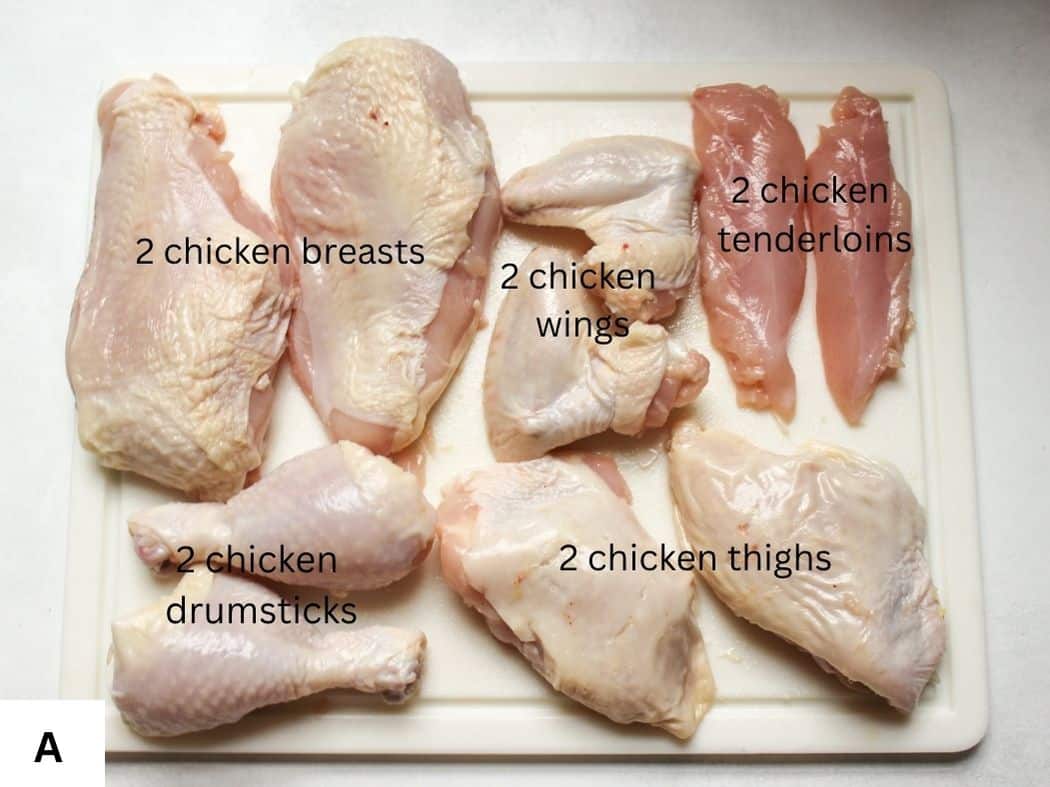
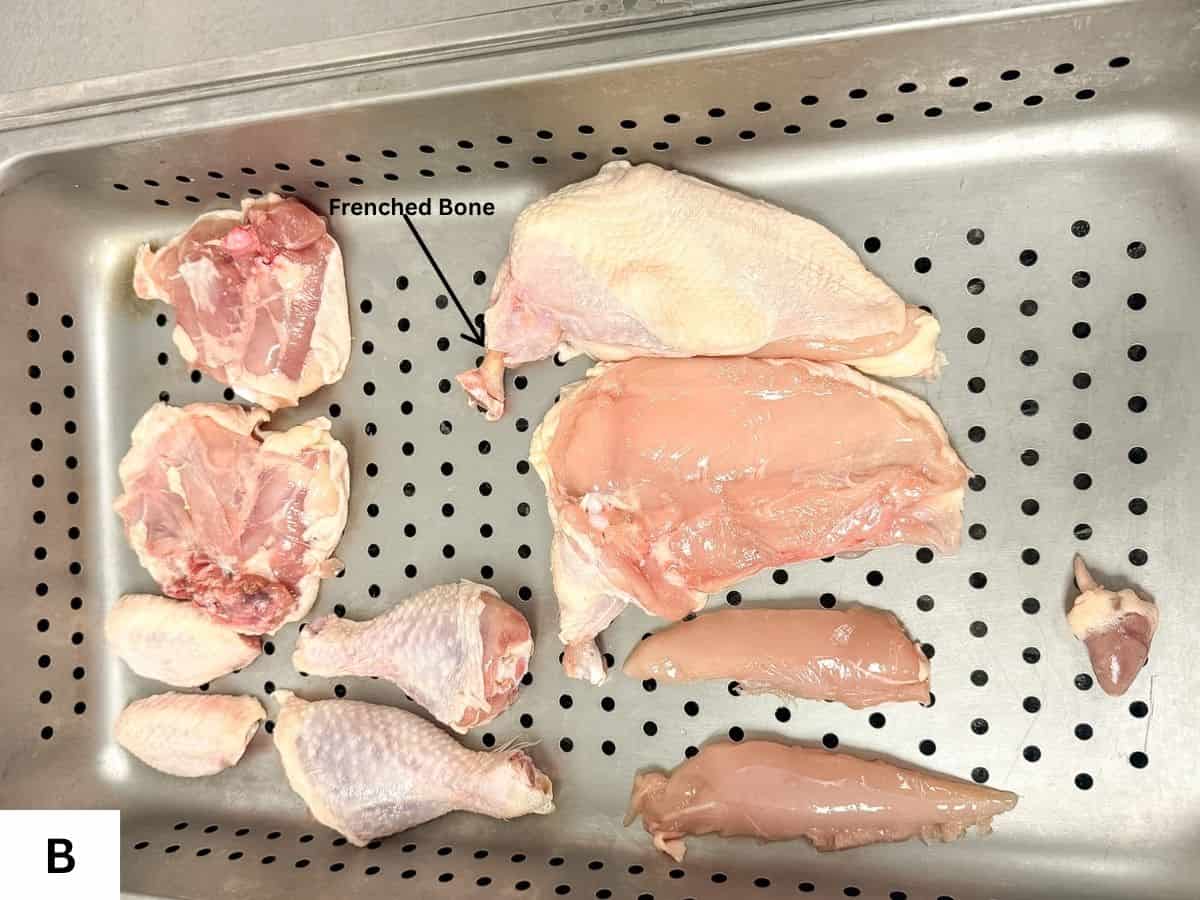
As a result, you will have the following chicken pieces:
- 2 Drumsticks
- 2 Thighs (with the flavorful oysters attached)
- 2 Wings (or 2 flats and 2 drumettes)
- 2 Breasts (Regular or Airline Style with Frenched drumette)
- 2 Tenderloins (removed from underside of breasts)
- Plus: 1 Carcass/Backbone + Wishbone + Neck/Gizzard (for your stock pot)
storage instructions
One you break the original tight sealed chicken package (unless you got the chicken from the farm stand, there will be no air-tight package), the best by date should be disregarded. It will not last until the original "best buy" or "use by" date on the store packaging. Once you cut the whole chicken into pieces, pat them dry well, double-wrap them in a plastic wrap tightly and store them in the fridge for up to 2 days. If you do not plan to use them within 2 days, freeze them for later use. You can wrap them in a plastic wrap and place them in a freezer-safe bags. Mark the bags with the date and type of content. When wrapped tightly and frozen right away, the raw chicken will last in the fridge for up to 1 year without losing its quality. When ready to use, thaw it overnight in the fridge. Do not refreeze thawed chicken, unless you do it within 1-2 days of thawing and it was thawed strictly in the fridge and has not been out at room temperature.
Ready to turn those 10 chicken pieces into dinner? Check out my chicken recipes category, to find delicious dishes using breasts, wings, thighs and more.
📖 Recipe
How To Cut A Whole Chicken
Equipment
- 1 large cutting board plastic or other nonporous material
- 1 boning knife
- 1 chefs knife or kitchen shears
Ingredients
- 1 whole chicken
Instructions
- Get everything ready. Place the cutting board on a damp paper towel to prevent it from sliding. Wear disposable gloves (optional). Have one container for the chicken pieces, one for carcass and other stock parts, and one for trimmed fat.
- Remove the chicken from the packaging. Check for giblets or a small bag, and remove it. Pat dry the chicken well with paper towels.
- Place the chicken with a breast side up on a cutting board with the neck cavity facing you. Feel for the small v-shape bone, called wishbone. Make two shallow cut alongside the bone using the tip of your boning knife℃, wiggle it gently until you can remove it. Removing the wishbone make the process of cutting the breasts easier and cleaner.
- Pull one wing away and stretch the skin tight. Choose your preferred method:A. Regular wing: Cut through the skin into the shoulder joint. Bend the wing back until it pops out of its socket. Slice through the cartilage to free the wing. Trim off the wing tip and save it for stock. Repeat on the second side. You can also cut each wing into drummete or wingette. B. Airline Breast Style (the drumette stays attached to the breast): Slice the skin slightly above the joint connecting the wingette and drumette. Pop the joint,cut straight through, and leave the drumette attached to the breast. Scrape the meat and clean off the top end of the drumette bone (called Frenching) for an elegant restaurant presentation.Note: See the detailed images in the blog post.
- Pull one leg away from the body and cut through the loose skin connecting the thigh to the breast. Bend the leg all the way back until the thigh bone pops out. You will be able to see the small, round, tender piece meat bulging near the top of the hip joint along the backbone, and this is your oyster (the most tender part of the chicken). Use the tip of your knife to trace and mark a line around the oyster right away, then sweep your blade deep along the curvature of the bone so the oyster stays attached to the thigh. Cut through the remaining skin to free the leg. Cut the leg into thigh and drum where the joint connects them. Repeat on the second side. Trim off any fat.
- Place the chicken breast-side up and locate the white center cartilage line (the keelbone). Make a straight cut with your boning knife down one side of the keel bone. Keeping the blade pressed flat against the bone. Using short, sweeping strokes with the tip of the knife angled against the rib cage, peel the breast meat away from the ribs from top to bottom. Repeat on the second side.
- Turn each breast half upside down. Slice away the loose strip of the chicken tenderloin. It is optional, but removing these prevents them from detaching or drying out during cooking. Cook the tenderloins separately as they cook much faster.
Notes
Nutrition
Culinary Glossary
- Boning knife: a professional kitchen knife with a thin and slightly flexible blade designed to cut around the bones with precision without leaving any meat behind.
- Wishbone: a bone shaped like a fork, located at the front of the breast near the neck cavity. It is best to remove it fist to make carving and separating the breast halves easier.
- Frenching: A culinary technique where meat, fat or cartilage are scraped from the end of the bone (such as a wing drummete, leg) leaving a clean bone. It is done for elegant visual presentation.
- Oyser: small and very tender piece of dark meat located in the pocket of the backbone near the lower thigh. It is the most flavorful part of the bird the bird.


Comments
No Comments