Learn how to make classic chicken Kyiv entirely from scratch, where the key is to keep that flavorful butter inside the chicken during the cooking process.
Jump to:
About the chicken Kyiv recipe
Chicken Kyiv (or chicken Kiev) is famous all over the world. I have even found one in the frozen section at our local grocery store in the US.
I have always thought that Chicken Kyiv originated in Ukraine, but there are some debated about the dish's exact origins.
But it does not really matter where it came from, it only matters how delicious it is.
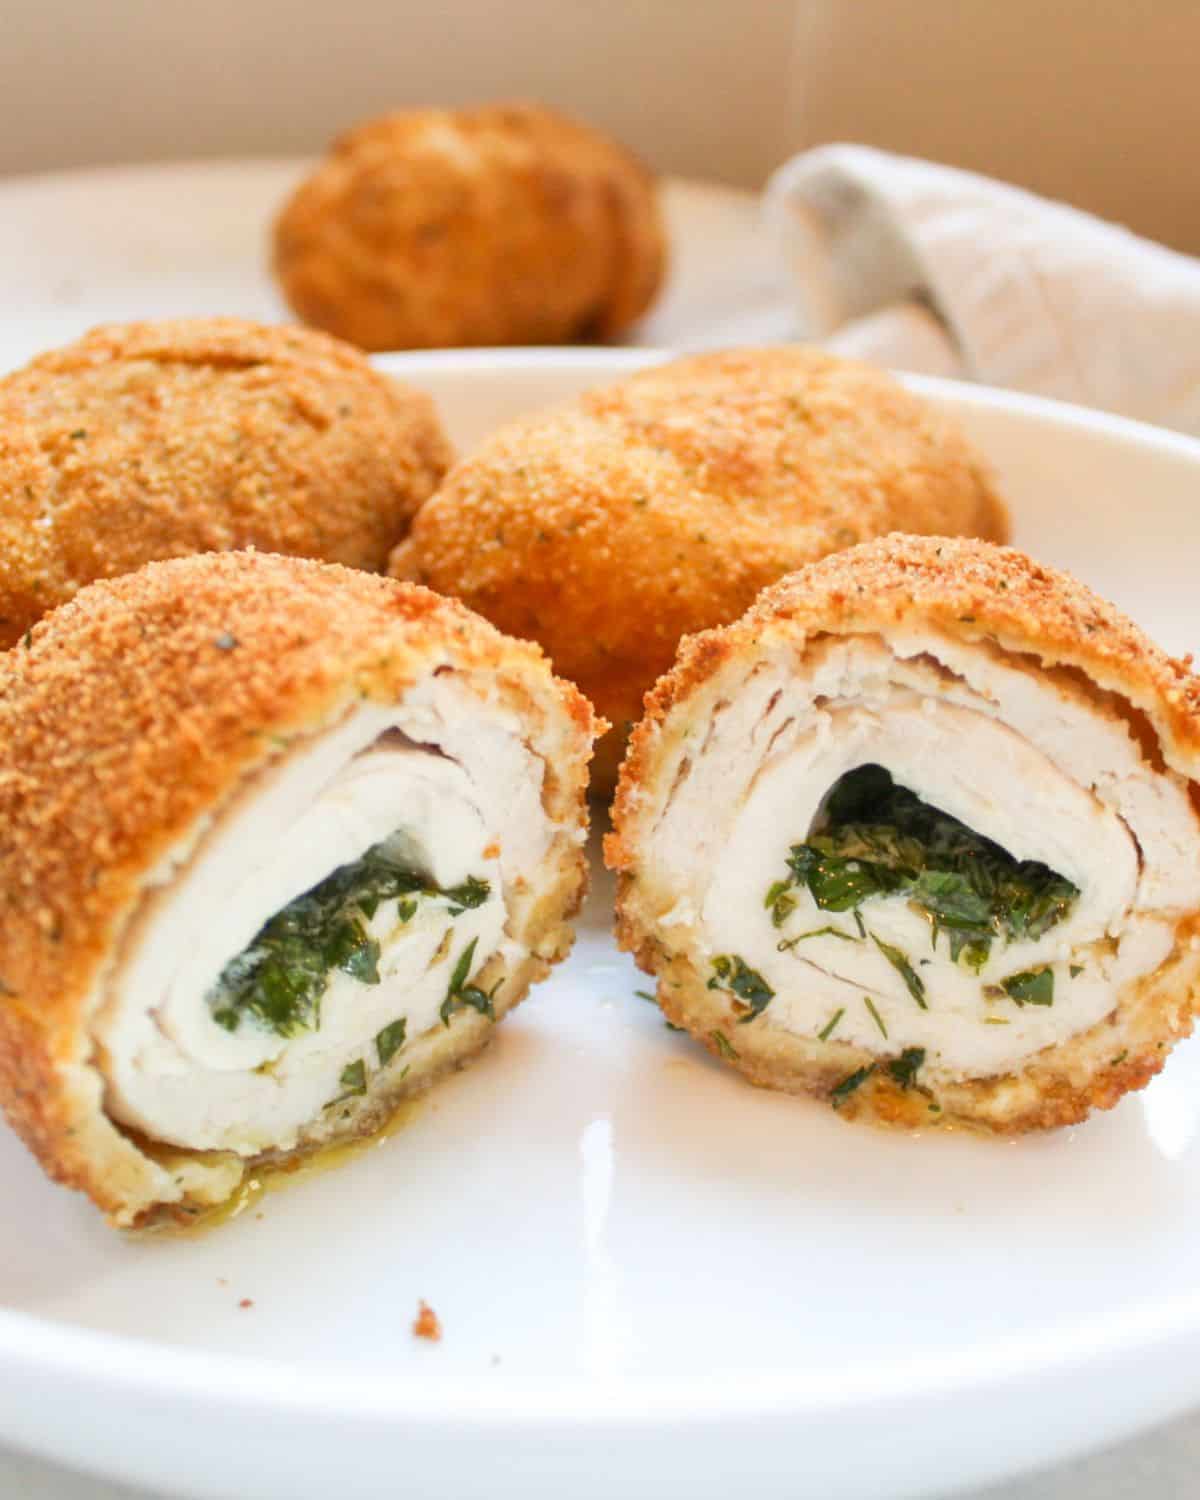
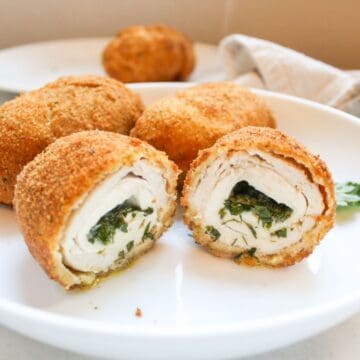
Pounded chicken breast stuffed with herb buttery filling, coated in breadcrumbs, briefly deep fried and then baked to perfection - that's the perfect chicken Kyiv I know.
I still remember grabbing "kotleta po Kievski" at least once a week on my way from college and enjoying it in my dorm room. In Ukraine, they were sold at those outside food stands, similar to food trucks in the US. Those stands had the best foods, including pyrizhky, bilyashi, chebureky, hot dogs, and of course chicken Kyiv.
The recipe is quite easy, with the only one challenge to keep the butter inside the chicken during the cooking process.
That's why, I am sharing with all tips and tricks to follow that always work for me to make this recipe.
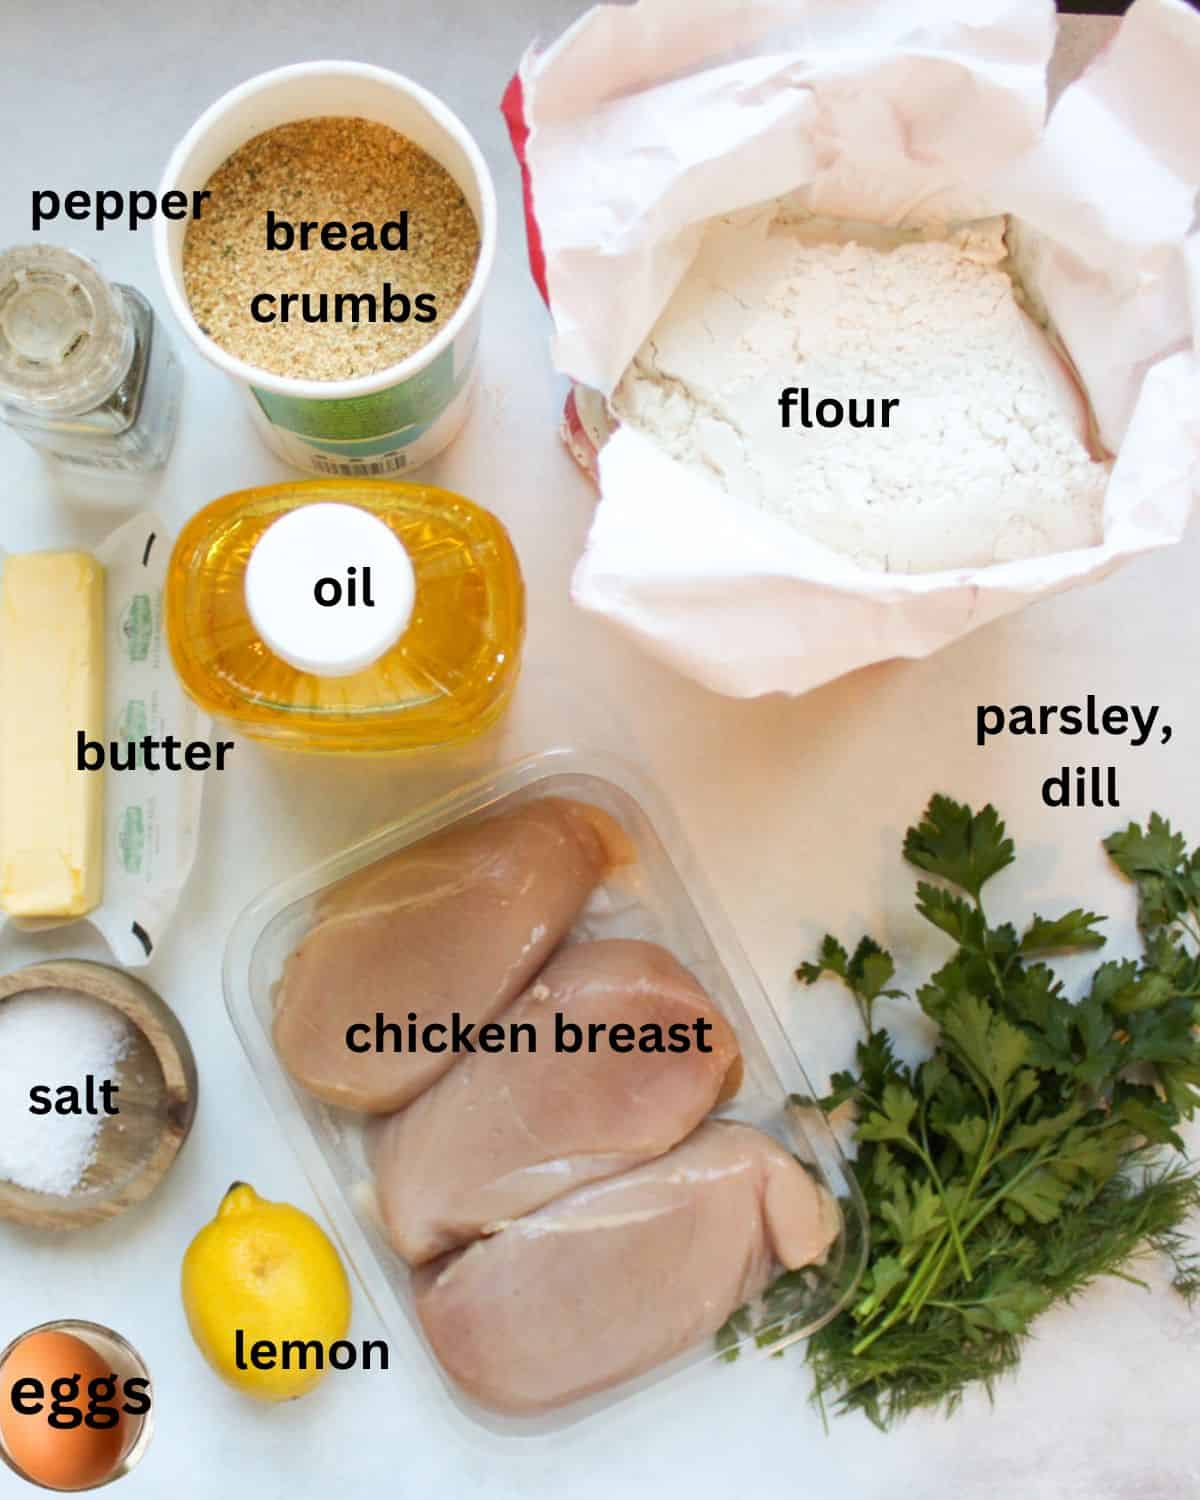
Ingredients
You can find the quantities for four servings in the recipe card at the end of this post.
- Chicken breasts: Choose larger boneless chicken breasts for this recipe, as they will be sliced in half.
- Butter: use quality butter, which is used as a base for the filling. I used unsalted butter, but salted works well too.
- Flour: all-purpose flour adds an extra layer for the breading to keep the kotleta sealed.
- Eggs: to make the egg wash that will hold the chicken together.
- Breadcrumbs: plain or other breadcrumbs. You can turn the dry bread into breadcrumbs easily in a food processor or a blender. You can also use panko breadcrumbs instead.
- Lemon juice (optional): I love adding some lemon juice to the compound butter for a fresh taste.
- Herbs: I used fresh parsley and dill.
- Salt and black pepper: for seasoning the chicken breasts
- Oil: canola oil or vegetable oil are the best ones for deep frying.
Step-by-step directions
Below are the detailed directions on how to make this recipe. The cooking process is easy but involves a lot of steps and some chilling time in the freezer. I also included detailed images for each step for visual help.
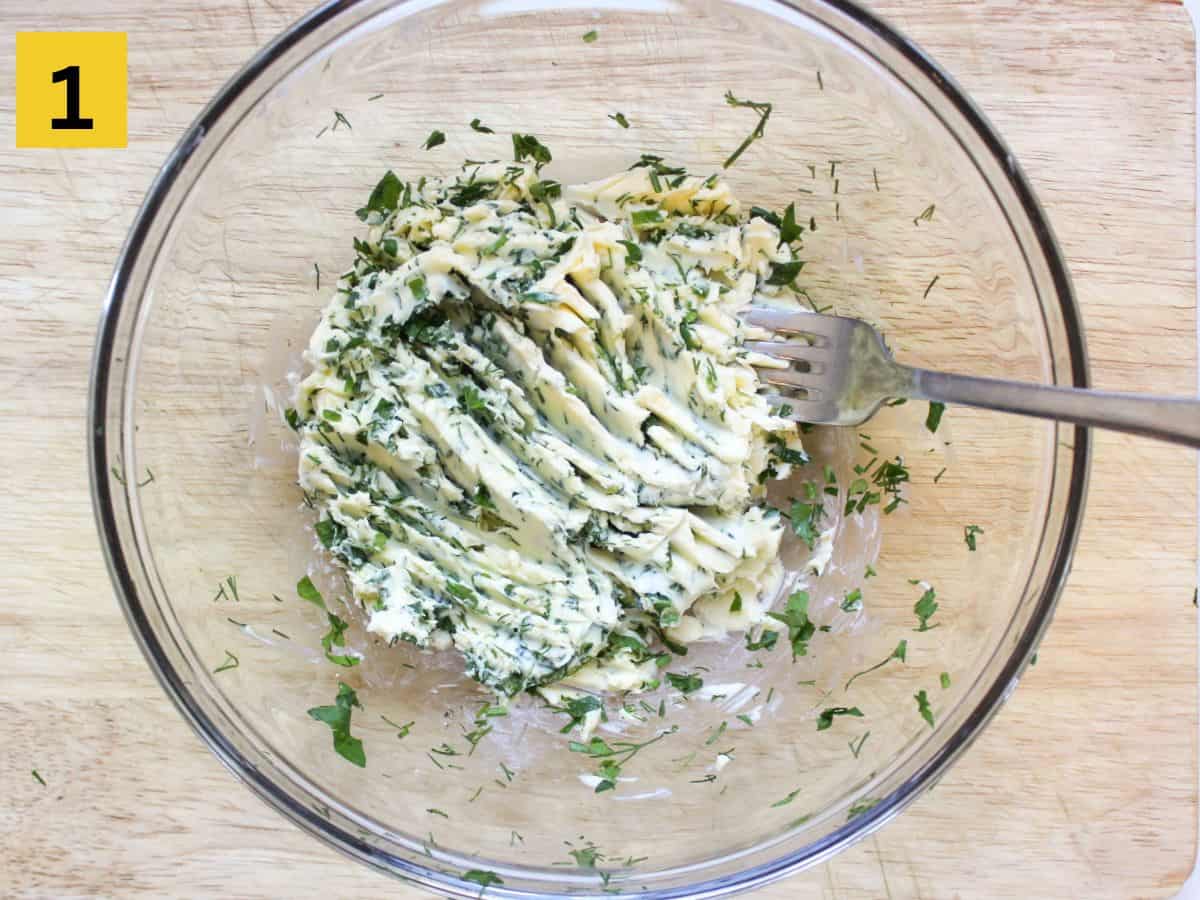
Step 1. Cut the butter into chunks and let it sit at room temperature for about 15 minutes or until it softens. Rinse and dry fresh herbs. Chop dill and parsley very finely. You can also use a food processor to do so. In a medium bowl, add butter, chopped herbs, freshly squeezed lemon juice, and a few pinches of salt. Use a fork to mix everything well, until the herbs are evenly incorporated into softened butter.
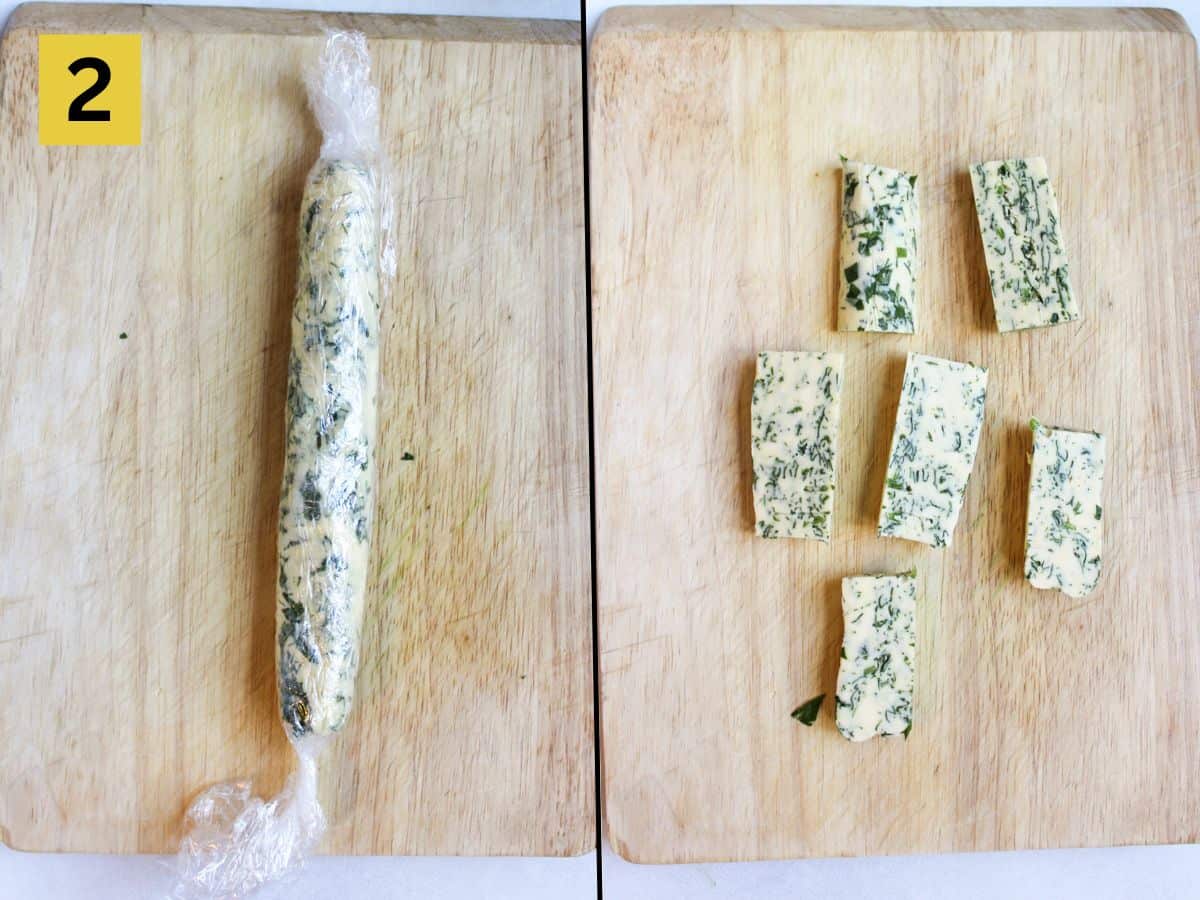
Step 2. Form a long butter log and wrap it tightly in a plastic wrap. Place it in the freezer for at least 30 minutes. You can make this step ahead of time to have already frozen herb butter on hand.
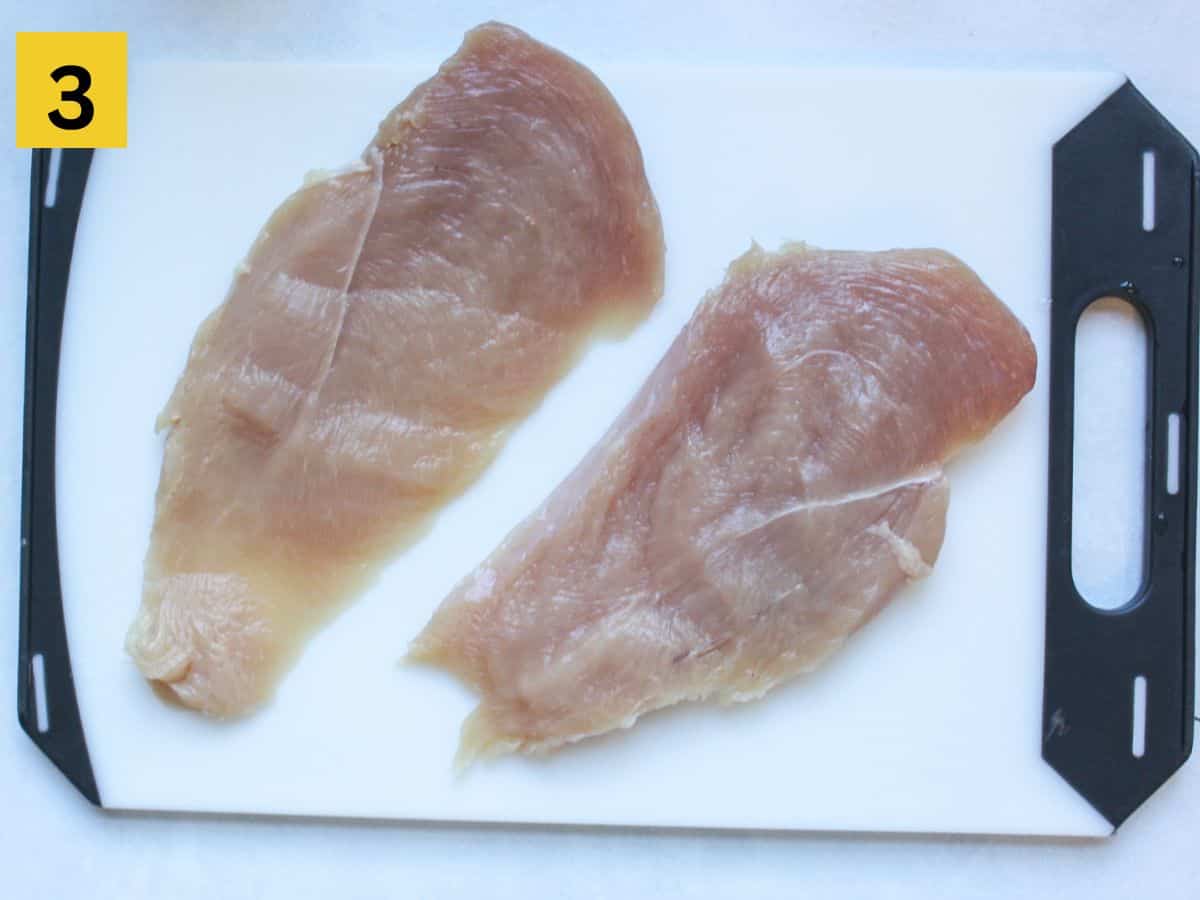
Step 3. Using a sharp knife, slice each chicken breast horizontally into two thin cutlets. Do the same with the other chicken breast. You will have 2 cutlets from one chicken breast.
For very small chicken breasts, butterfly them and pound the same way.
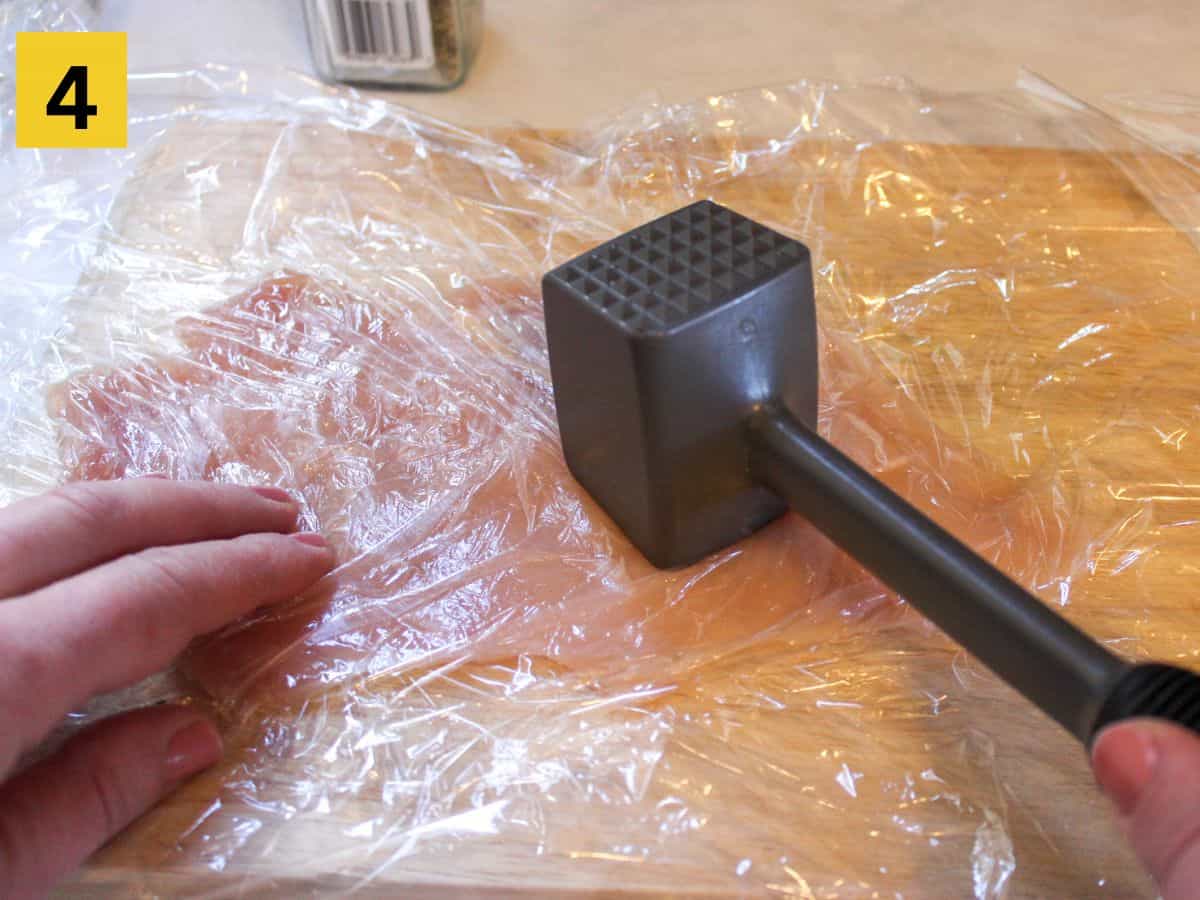
Step 4. Line a cutting board with some plastic wrap. Place one thin cutlet on top facing the cut side up. Cover it with another piece of plastic wrap. Using the flat side of a meat tenderizer, gently pound the chicken breast to an even thickness of about 0.5 cm (¼ inch). If you do how have a meat mallet, use a rolling pin. Repeat with the rest of the chicken cutlets.
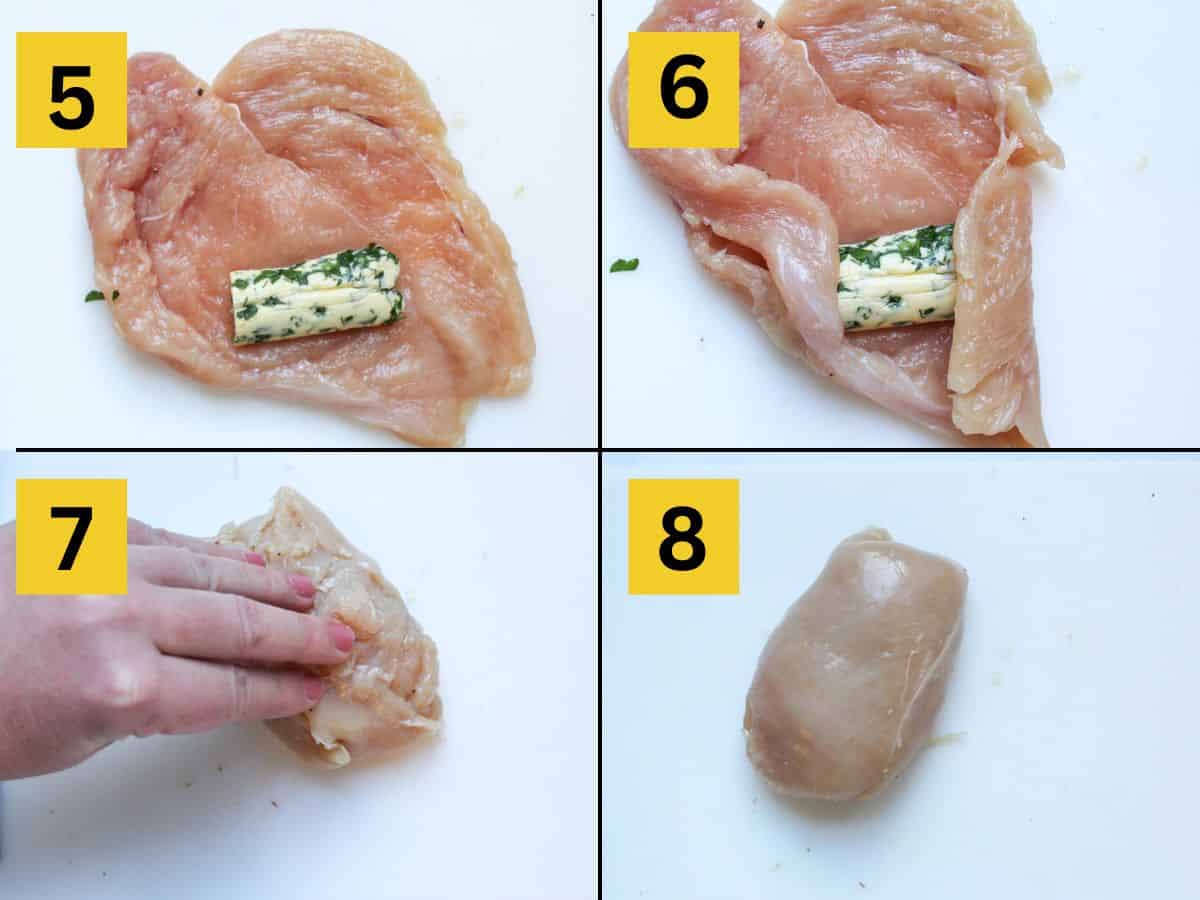
Steps 5, 6, 7, 8. Remove the butter log and slice it in half, and then slice each half lengthwise. You will have 4 long pieces. Line a large plate or baking pan with some parchment paper to prevent the chicken from sticking in the freezer. Place one pounded chicken on a cutting board and season with a pinch of salt and pepper. Place frozen butter in the center closer to one of the thinnest ends.
Fold the sides of the chicken breast over the herb butter, then roll it up tightly, and tuck any chicken inside, ensuring that the herb butter is completely enclosed. Place it on a prepared plate lined with parchment paper. Repeat with the rest of the chicken. I tore a few slices and used them to double-wrap some of my cutlets. Just letting you know that you do not have to throw away the torn cutlets, but use them as well.
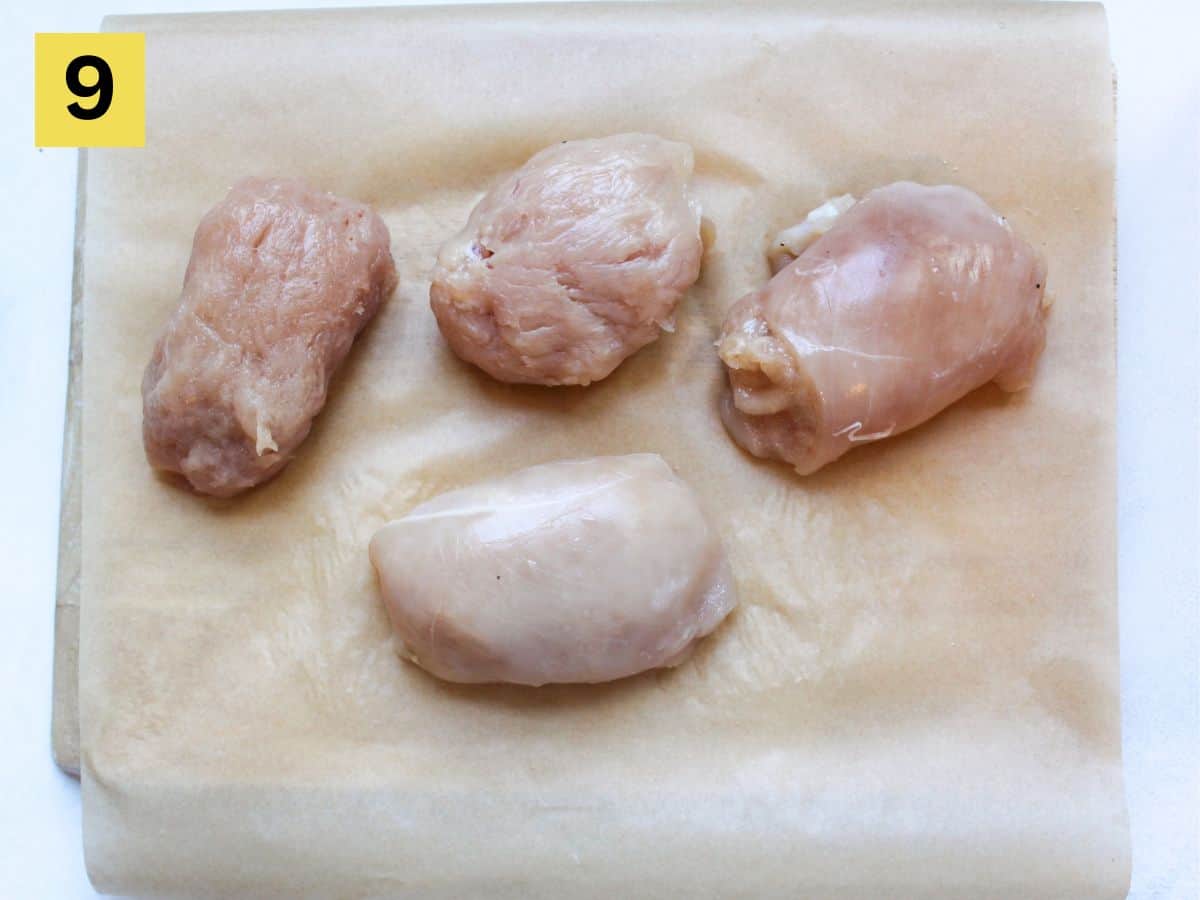
Step 9. Place rolled cutlets in the freezer for about 30-40 minutes, but do not freeze them. They should chill, so the ends seal.
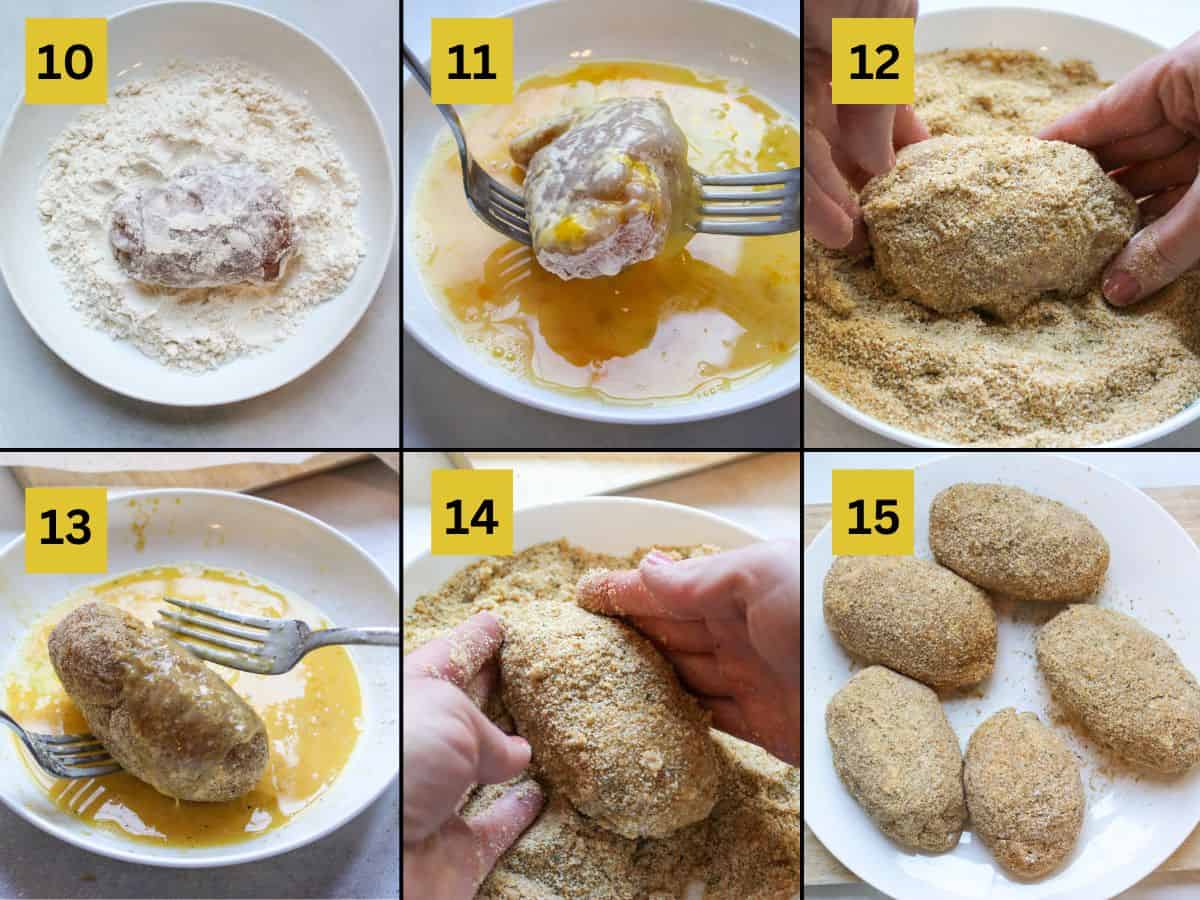
Steps 10, 11, 12, 13, 14, 15. Meanwhile, prepare the breading station. In separate shallow dishes, add flour, beaten eggs, and bread crumbs. Add two forks to a dish with eggs. Using a fork to dip the chicken in eggs prevents your fingers from being breaded as well. Otherwise, you will have to rinse them each time.
Take the chicken out of the freezer. Take the first cutlet and coat it in the flour, shaking off any excess flour. Transfer it to a dish with eggs. Use two forks to roll the chicken in eggs until it is well coated. Now, using two forks transfer it to the dish with breadcrumbs. Using your hands coat the chicken with breadcrumbs, pressing them gently to stick to the meat. After that, coat them again into the egg mixture and then, into the bread crumbs. I have made 2 cutlets with single coating and 2 with double coating.
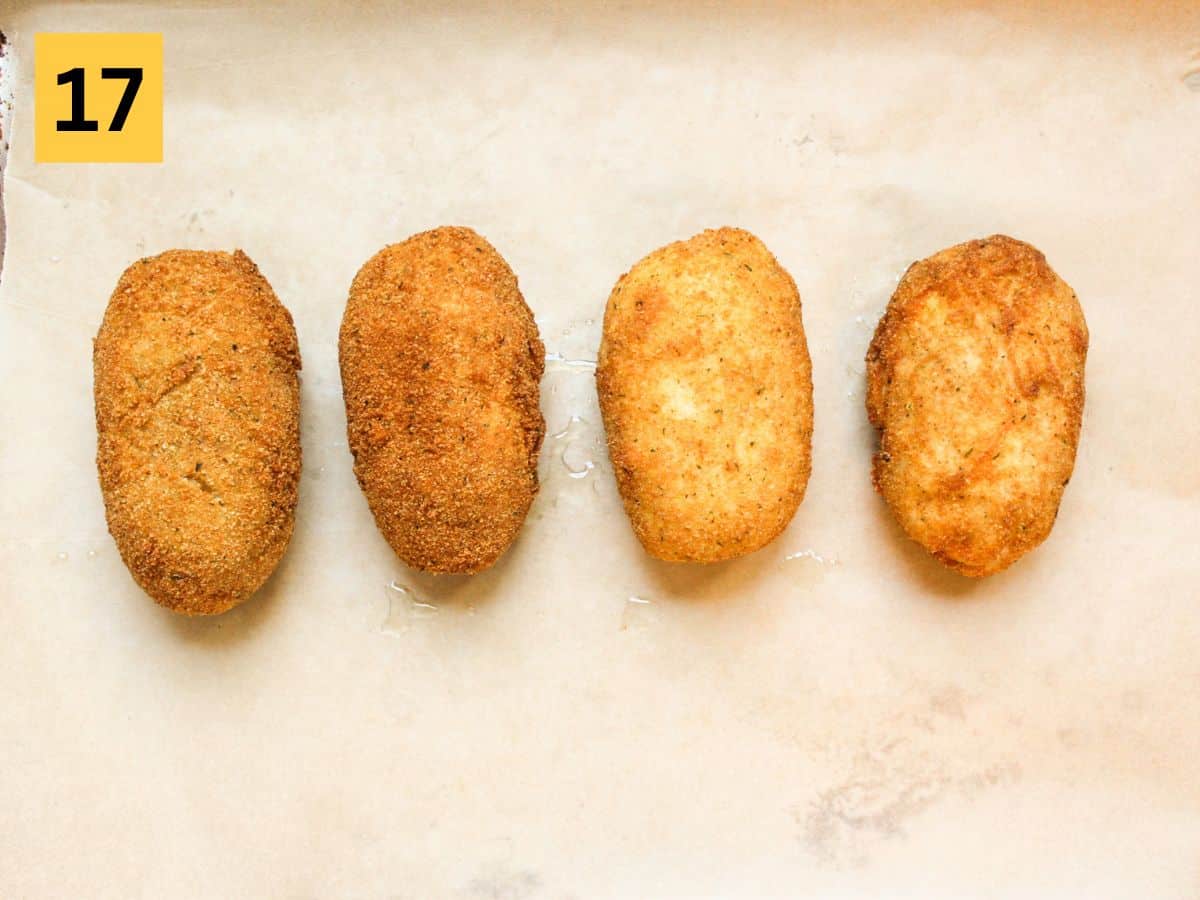
Double-coated cutlets look more uniform, have better adhesion, and are crispier. It also reduces the chances of uneven or thin spots in the crust. (Step 17 image below, you can see that the 2 left ones had double coating).
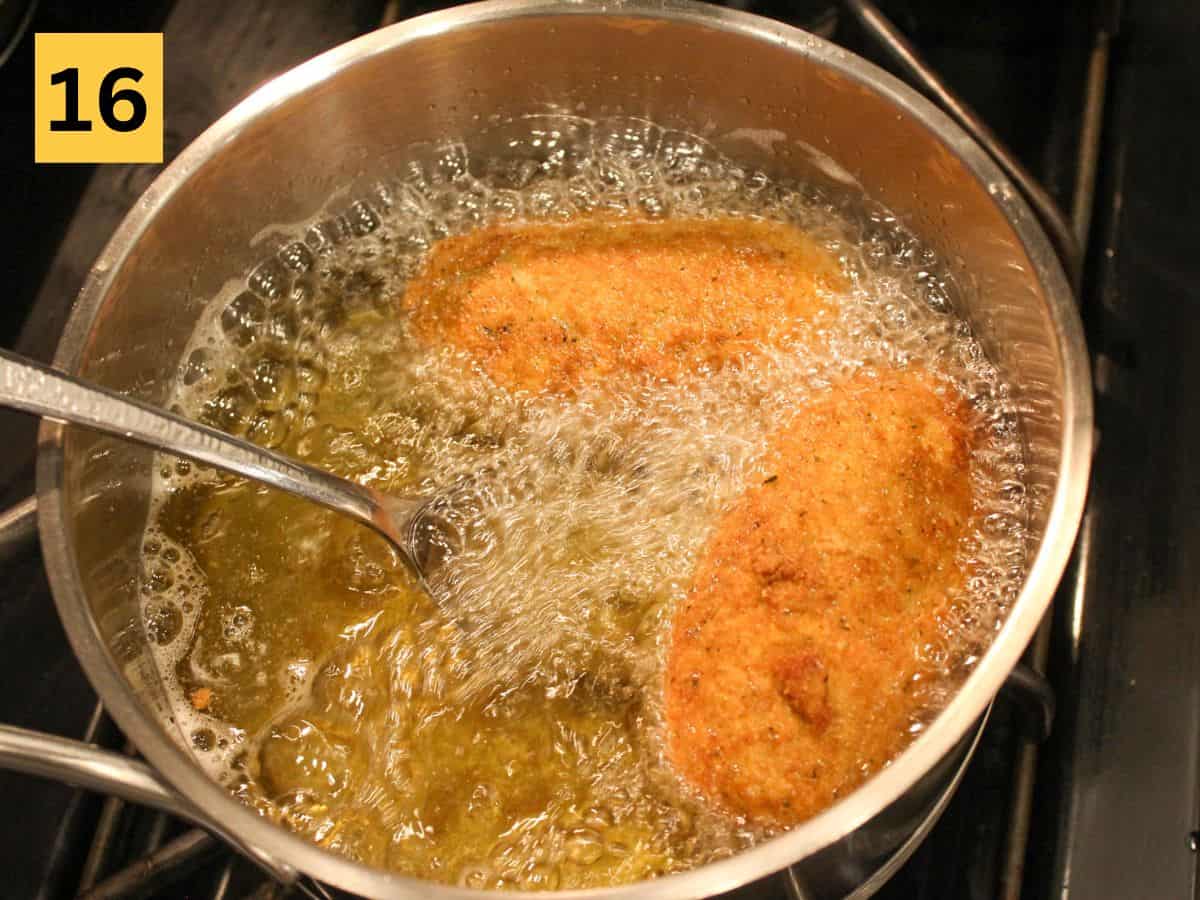
Step 16. After you bread all the cutlets, place them in the fridge for at least 15 minutes. Meanwhile, preheat the oven to 400°F and line a baking pan with parchment paper.
In a dry medium pot, pour canola or vegetable oil. You will need enough to cover the cutlets fully or at least halfway. Heat the oil to 350 degrees F. If you do not have a thermometer, drop a small piece of bread into the oil. If sizzles and turns golden brown within about 15 seconds, the oil is likely around 350°F. Carefully place 2-3 chicken cutlets in hot oil and fry them for about 2-3 minutes on both sides or until they are golden brown over medium heat. Use a slotted spoon to take them out and place them on a baking dish with lined parchment paper. Repeat with the remaining chicken.
Step 17. Bake the cutlets for about 15-17 minutes or until they or fully cooked. I usually can tell by tiny bubbles coming on top of the bread coating, it is a great indication that they are fully cooked and the butter is boiling inside. If you use the meat thermometer, ensure you do not insert it in the very middle, as the melted butter will pour out. Internal temperature should reach 165°F. Check it by inserting it on the side of the cutlet.
Nataliia's tips
By following these tips, you'll be well on your way to creating a delicious and perfect Chicken Kyiv.
- Chill the butter: to prevent the butter from melting too quickly and running out, freeze it until firm, for about 30 minutes.
- Evenly pound the chicken: use only a flat side of a meat mallet or rolling pin to pound the meat, aim for an even thickness of about 0.5 cm (¼ inch)
- Double Coating for Crispy Texture: I compared single and double coating to see the difference. Double coating created more uniform and crispier cutlets. Simply, after the first coating of eggs and breadcrumbs, dip the chicken back into the egg mixture and breadcrumbs for a second layer.
- Baking: do not attempt to finish the dish by frying it in oil, the outer layer will burn while the inside might be still raw. Instead, after deep frying until golden brown, finish the chicken in the preheated to 400°F oven for about 15-17 minutes.
- Serving: in Ukraine, Chicken Kyiv is typically enjoyed as a street food by itself or as a main dish alongside potatoes, vegetables, or a salad. Like any other chicken dish, you can pair it with various sides, such as French fries, rice, mashed potatoes, or steamed veggies.
How to store and reheat
I really like to enjoy and serve this dish right out of the oven. But the leftovers are also great. Simply store them in an airtight container in the fridge for up to 3 days. I found microwave or air fryer is the best way to reheat this dish.
Make ahead: After you stuff and bread the chicken, place it on a baking sheet or tray lined with parchment paper, making sure they are not touching each other. Place the tray in the freezer and let it freeze for about 1-2 hours or until it is firm. Once the Chicken Kyiv pieces are frozen, transfer them to airtight freezer-safe containers or freezer bags. Label the containers with the date and content. Store the frozen Chicken Kiev in the freezer for up to 2-3 months.
When ready to use, follow the frying and baking directions adding about 15 minutes to the baking time. You can also cook them in the air fryer.
Frequently asked questions
While Chicken Kyiv is traditionally made with chicken breast, if you can successfully pound chicken thighs thinly without them breaking, they can be used as an alternative. Another option is to use ground chicken, which can be even more convenient for stuffing with butter.
Yes, you can assemble and freeze breaded, uncooked Chicken Kyiv for later use. Follow the freezing instructions provided earlier in this post.
I had success in keeping the butter inside the chicken while cooking by following these tips: First, freeze the herb-infused compound butter. Next, ensure that you pound the chicken thinly and tuck it carefully to seal all sides. Finally, place the stuffed chicken in the freezer for about 30 minutes before proceeding to bread them.
Yes, you can use different herbs and add other ingredients, such as minced garlic, finely chopped sun-dried tomatoes, shredded cheese, and mushrooms.
More chicken recipes
- Panko chicken breasts
- Chicken and orzo bake
- Air fryer chicken fajitas
- Baked chicken wings
- Ground chicken rissoles
- Air fryer breaded chicken cutlets
- Air fryer home-made chicken patties
More Eastern European recipes to try
📖 Recipe
Classic Chicken Kyiv
Equipment
- 1 meat tenderizer or rolling pin
- plastic wrap
- kitchen thermometer
Ingredients
Compound Herb Butter
- 1 stick unsalted butter, softened
- 2 Tablespoons finely chopped dill
- 2 Tablespoons finely chopped parsley
- 1 Tablespoon (optional) lemon juice
- 2 pinches salt, to taste
Chicken Kyiv Cutlets
- 2 large chicken breasts, boneless and skinless
- ½ cup all purpose flour, or as needed
- 3 eggs, lightly whisked
- 2 cups breadcrumbs
- 1 teaspoon salt
- ½ teaspoon black pepper
- 3 cups canola or vegetable oil for frying
Instructions
Compound Herb Butter
- In a medium bowl, add softened butter, chopped herbs, lemon juice and a few pinches of salt. Mix it all well with a fork until well combined.
- Form butter into a log and roll it in a plastic wrap tightly. Place it the freezer for at least 30 minutes or until it is firm. You can also prepare the butter the night before. Take it out only before you are ready to make the cutlets.
Chicken Kyiv cutlets
- Slice each chicken breast into two thin cutlets. Place a cutlet on a cutting board with a plastic wrap. Cover it with another layer of plastic wrap. Pound the chicken gently with a flat side of a meat mallet (or rolling pin) to an even thickness of about 0.5 cm (¼ inch). Set aside and repeat with the process with the rest of the meat.
- Take out the butter from the freezer and place it on a cutting boar. Cut the log half and then cut each half lengthwise, so you have 4 long pieces. Set it aside on a separate plate.
- Place one pounded chicken cutlet on a cutting board. Season it with about ¼ teaspoon of salt and some pepper. Place one chunk of butter in the middle of the chicken cutlet, closer to the thinnest end. Fold the sides of the chicken breast over the herb butter, then roll it up tightly, making sure to tuck in any protruding chicken to ensure the herb butter is fully sealed inside. Repeat with the rest of the cutlets.
- Arrange rolled chicken breasts on a baking pan or a plate lined with parchment paper and place them in the freezer for at least 30 minutes. Chilling them will help to seal the meat better.
- In a three separate shallow dished, add flour, whisked eggs and bread crumbs. Remove the chicken from the freezer. Take a cutlet and coat it in flour, shaking off any excess. Dip it into beaten eggs, ensuring a thorough coating, and transfer it to a dish with breadcrumbs. Use your hands to coat the chicken with breadcrumbs, gently pressing them to adhere to the meat. Repeat the process by dipping it back into the egg mixture and then into the breadcrumbs. You can choose to do a single coating or double coating for your cutlets; double-coated ones tend to be more uniform and crispier. Repeat with the remaining 3 cutlets.
- After coating the cutlets, place them in the refrigerator for at least 15 minutes. Meanwhile, preheat the oven to 400°F and line a baking pan with parchment paper.
- In a medium pot, heat canola or vegetable oil until it reaches 350°F. Carefully, add 2-3 chicken cutlets into the pot and fry them for approximately 4-5 minutes turning them half way, until they turn golden brown. Use a slotted spoon to remove the cutlets and place them on the prepared baking dish. Repeat this process for the remaining chicken.
- Bake the cutlets for about 15-17 minutes in a preheated oven or until they are fully cooked. Look for tiny bubbles forming on top of the bread coating as an indication of doneness. To double-check, you can also use a meat thermometer by inserting it into the side of the cutlets, making sure it reaches 165°F. Avoid inserting the thermometer into the very center to prevent the melted butter from leaking out.
- Once the chicken is fully cooked, remove it from the oven and serve it hot alongside your favorite side dish.
Comments
No Comments