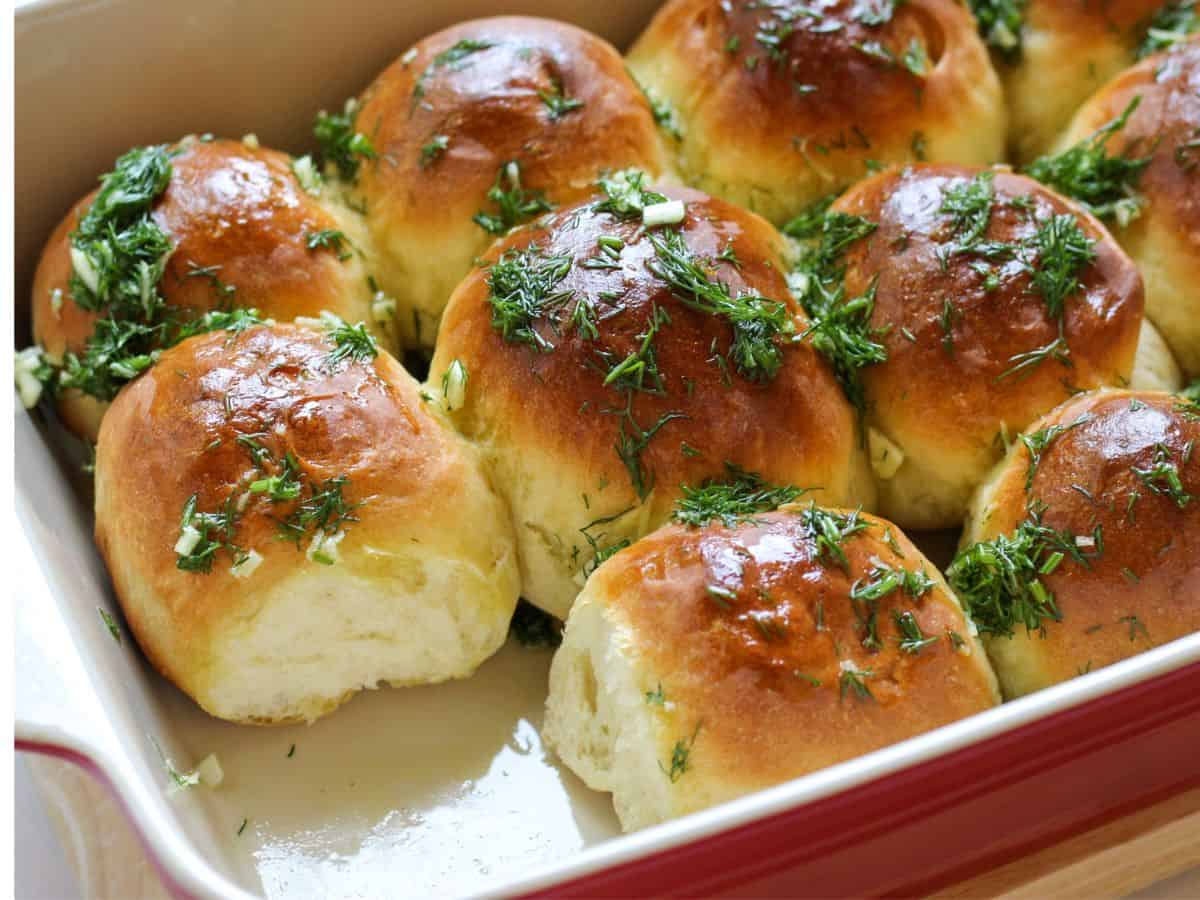
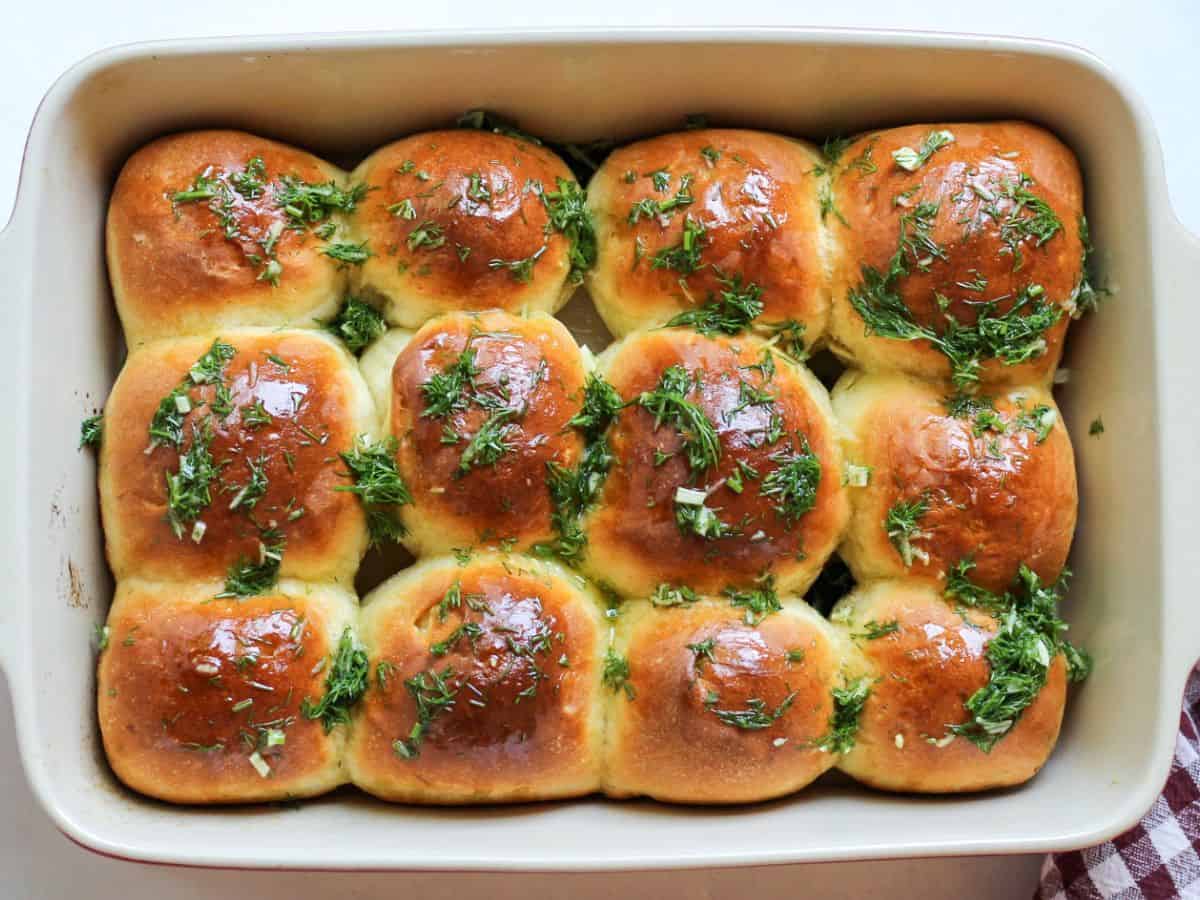
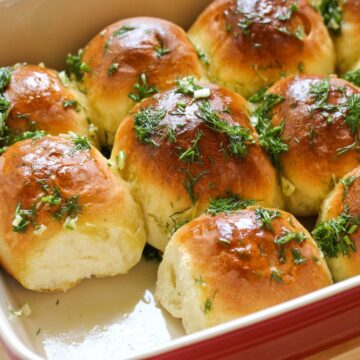
There is no better companion to a bowl of red borscht than pampushky, traditional Ukrainian garlic bread rolls. These are not your average dinner rolls. They are ultra soft, yeast-raised bread rolls baked until golden and finished the the fragrant soak of garlic and fresh garlic oil while steaming hot.
Feedback from our community:
"Made them this morning. Managed to keep the dough sticky without getting it stick on the utensils,the bowl or the kneading surface. They turned out brilliantly delicious. Can't leave them alone. Definitely going to do some over Christmas"
Jump to:
Pampushky (the plural form of pampushka) are soft Ukrainian garlic bread rolls. These bread rolls are usually served with Ukrainian borscht soup, but they are great with any dish.
Pampushky are perfect as a holiday dinner rolls. Hundreds of years ago, the first-ever pampushky were not baked but fried in lard (smalets). We still fry them sometimes, especially when making sweet pampushky that resemble modern donuts. I remember my mom used to fry them in oil and cover in powdered sugar. Such a great sweet treat.
If you like making easy breads with yeast, try my soft sandwich bread recipe.
Ingredients and substitutions
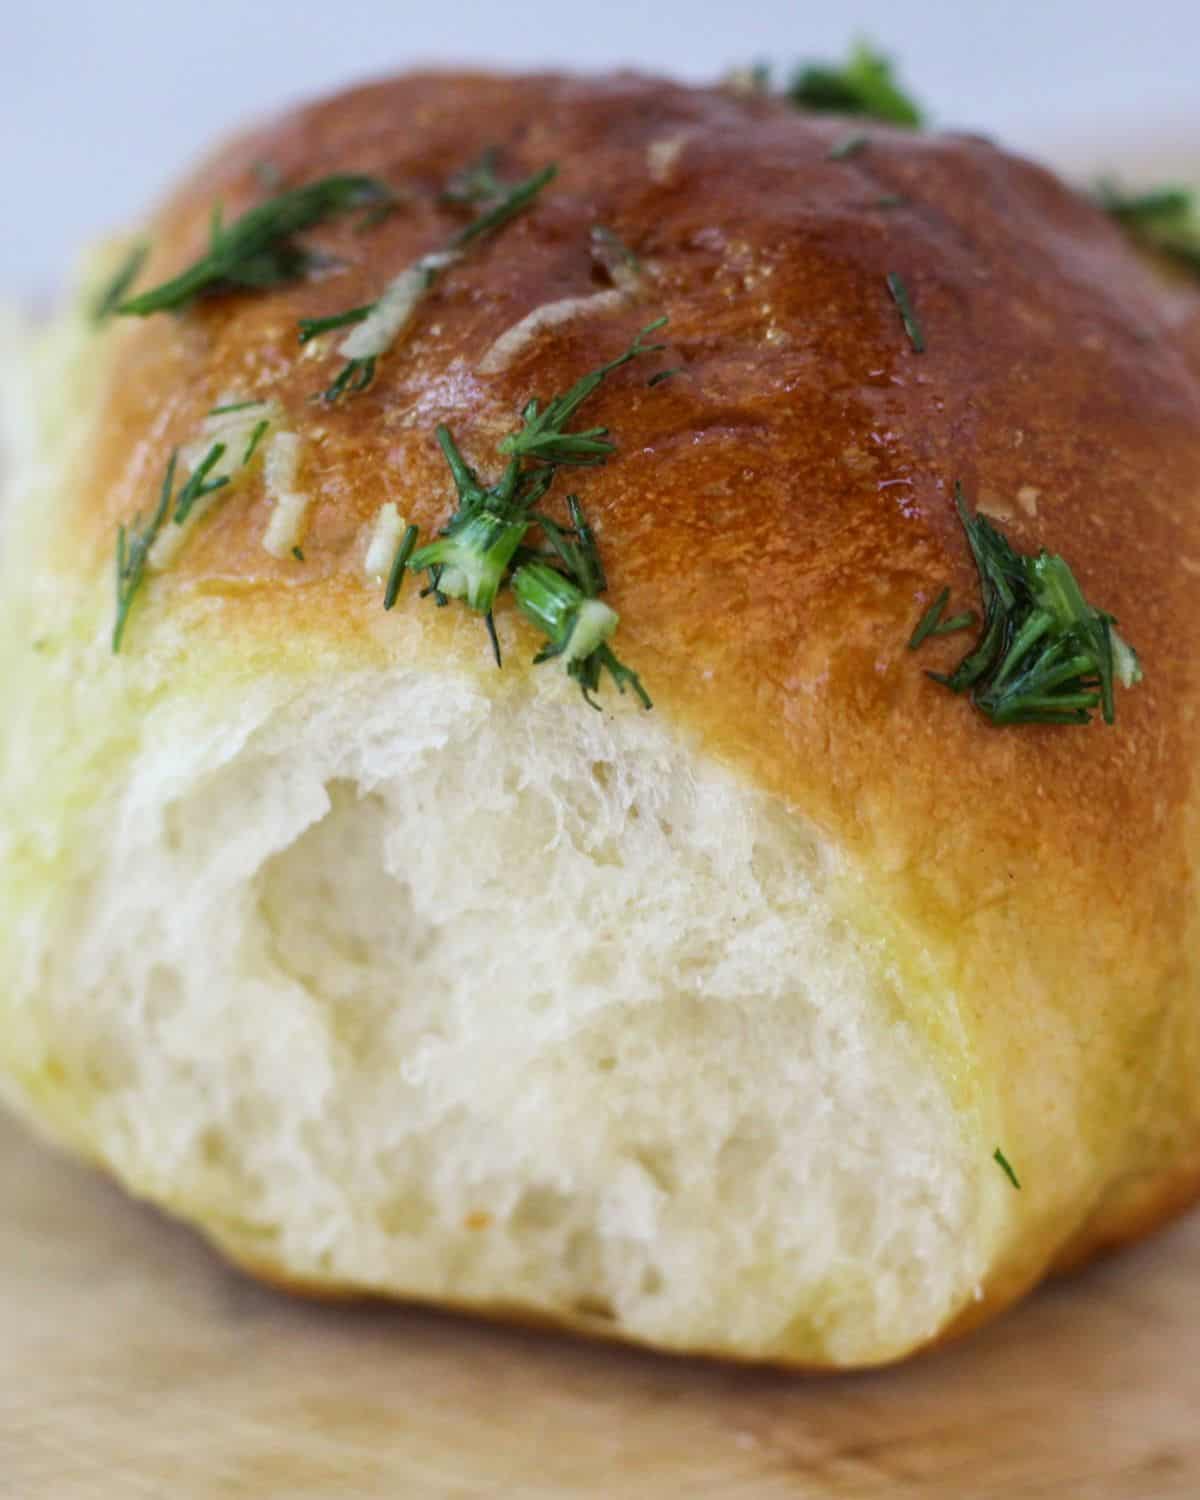
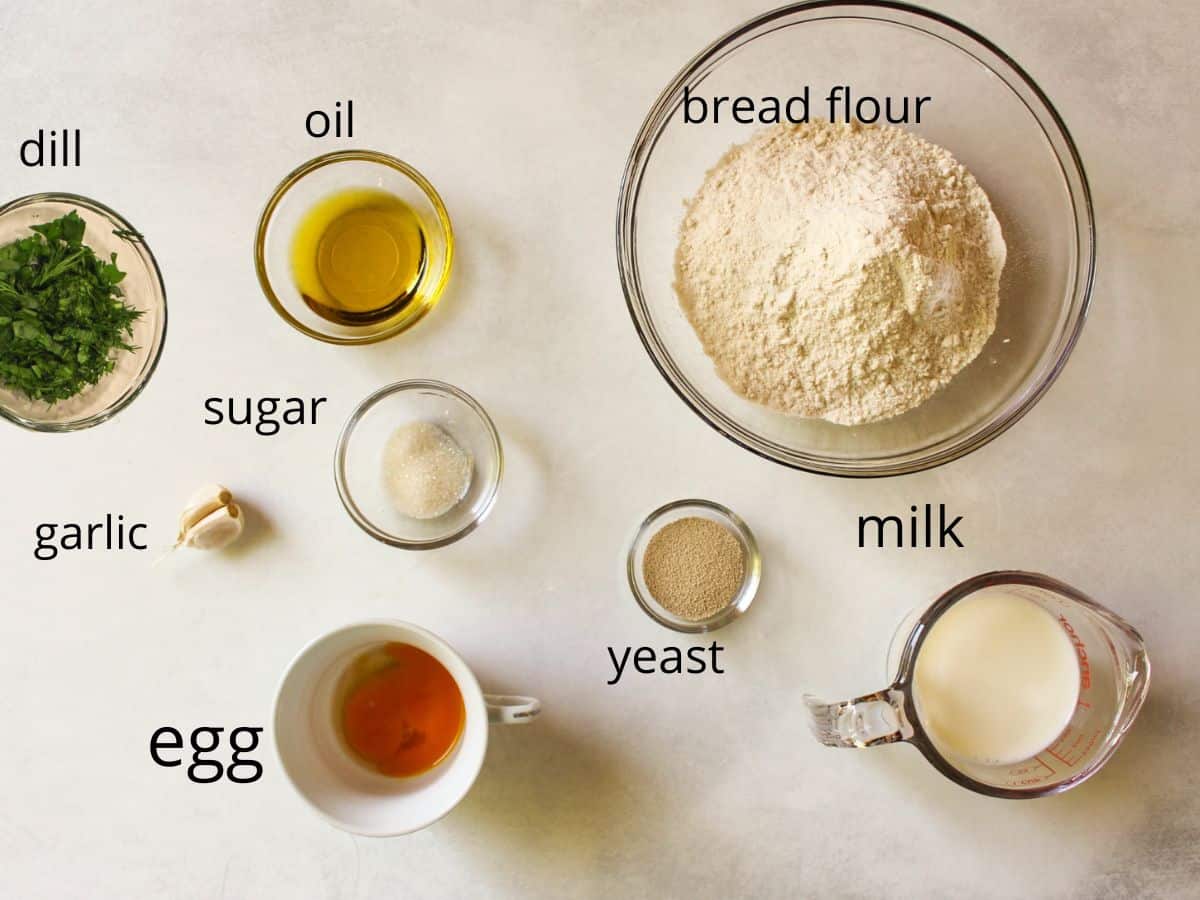
- Bread flour - I used bread flour for these bread rolls for a cloud like texture. I tried this recipe using all-purpose flour and the texture was a little bit dense, although they tasted great.
- Milk - I used 2% fat milk. Whole milk will work great too. If you avoid dairy, use water. Some recipes suggest using pickle juice instead. But I never tried using it.
- Sugar - Just a little bit of cane sugar for taste and to activate the east faster.
- Active dry yeast - I use Fleischman's and always have a beautifully risen dough. Any good quality yeast will work great, make sure it is not expired and was stored properly.
- Egg - this recipe requires an egg added to the dough. Some recipes skip the egg, but after testing it both ways, the egg makes the bread rolls much softer and taste rich.
- Salt - for the savory taste.
- Oil - Traditionally, we use sunflower oil. I always had great results using olive oil as well. You will need oil to add to the dough and to make a garlic-infused oil topping.
- Garlic and fresh dill - to make the best topping for the bread rolls. If you do not like dill, you can also use fresh parsley instead.
How to make
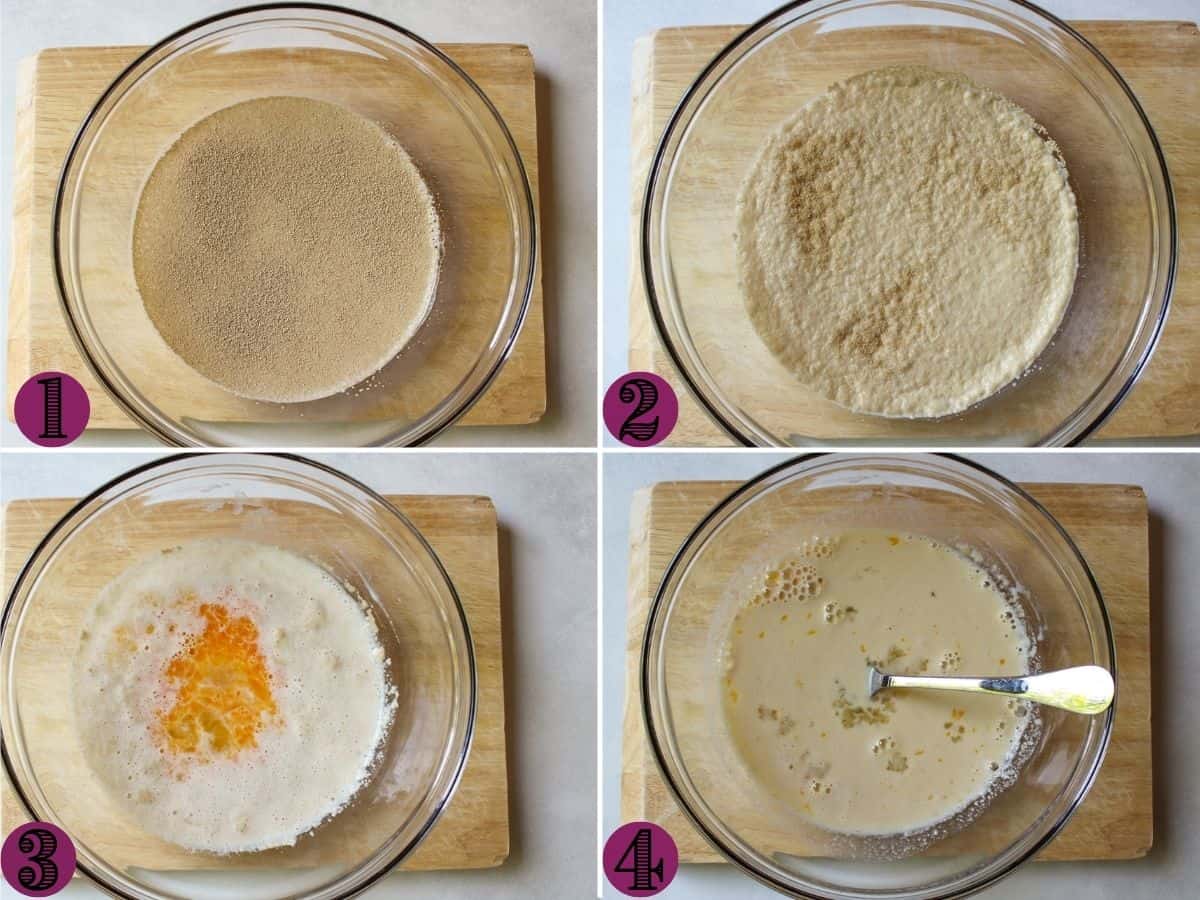
- Activate Yeast - First, microwave the milk for about 30-40 seconds until warm. For best results, use a kitchen thermometer to make sure the milk temperature is between. 100°F- 110°F. In a large bowl, add warm milk and sugar. Stir to dissolve the sugar. Now, sprinkle yeast over the milk and let it sit for about 10 minutes to activate. The bubbly foam should appear on top with a nice pleasant yeast smell. stir the yeast mixture briefly with the fork, once it's activated. Now, add the beaten egg by stirring it in the mixture gently.
- Make the dough - Gradually start adding flour by stirring it in with a silicone or wooden spatula. Do it gradually, ½ cup at a time. Once it is super hard to mix it with the spatula - stop adding the flour. Add 2 Tablespoons of olive oil and gently fold it in using hands.
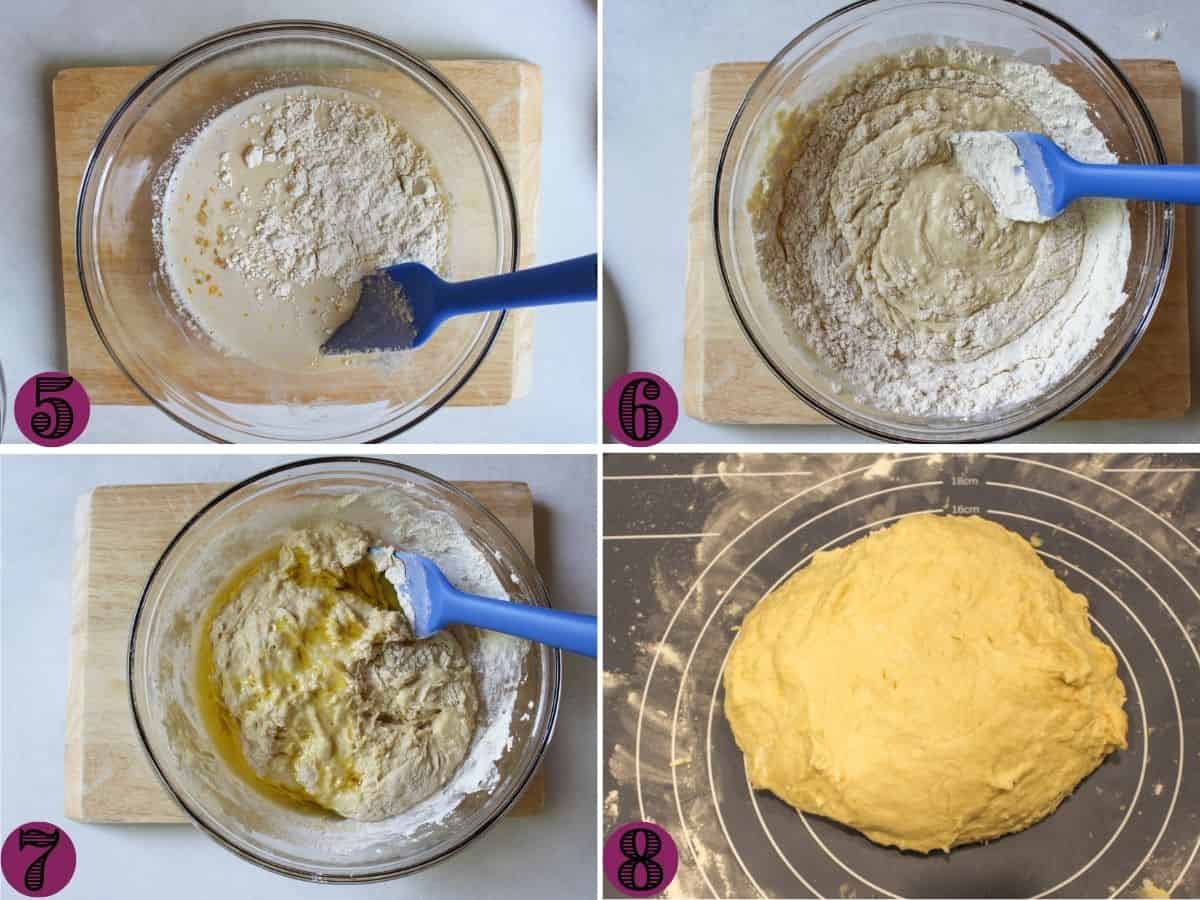
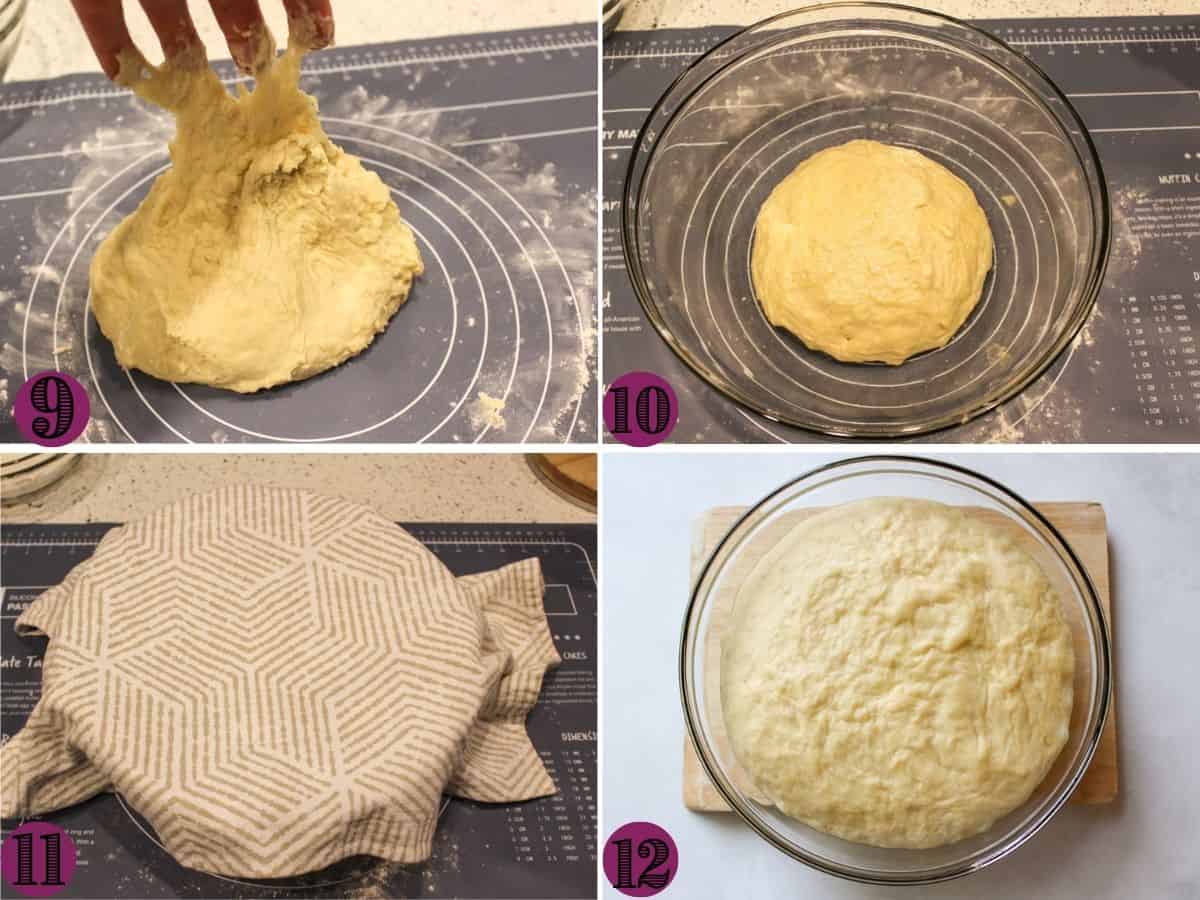
- Knead - Wash and dry your hands well. Dump the sticky dough onto a floured surface and start kneading. You might have some flour left from the measured amount. It all depends on how your measure the ingredients, and what kind of flour you use. Start kneading it by pushing the heels of your hands into the dough and reshaping it. Knead for about 3-5 minutes. It will remain quite sticky. You can use a dough scraper to help with kneading. But If it is still very very sticky and wet, sprinkle some extra flour on top and knead for another 2-3 minutes. The good dough will remain sticky before rising and it will stick to your hands (you can see it in the picture). But you have to be able to shape a soft ball that flattens when you put it on a flat surface.
- First rise - Grease hands with some olive oil, pick up the dough ball, and place it in the lightly oiled bowl. Cover with a clean towel and place the bread dough in a warm or room temperature place to rise. If it's too cold at home, I preheat the oven and place the dough on the counter near the store. Let it rise for about 1 hour until it more than doubled in size.
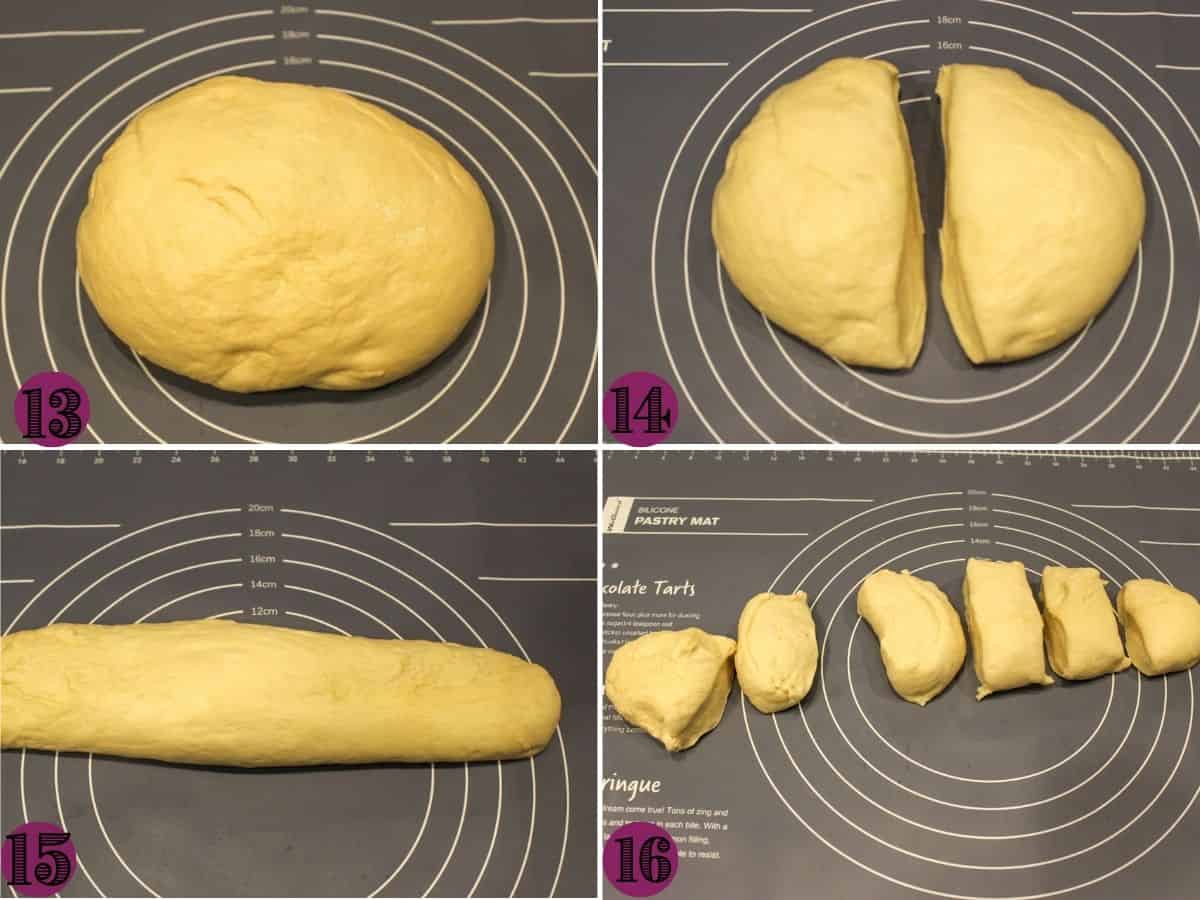
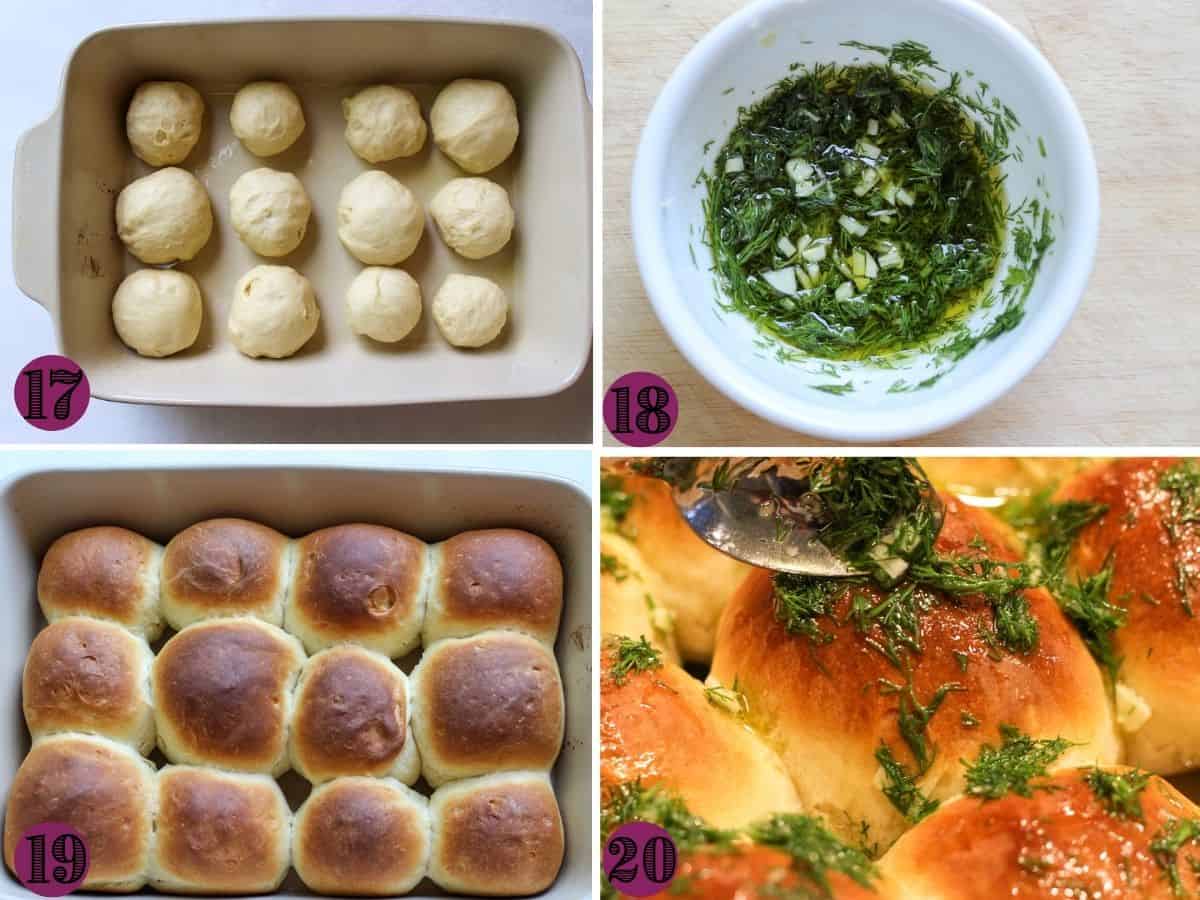
- Form the rolls - prepare a large baking dish by greasing it with some olive oil. Transfer the risen dough onto a clean surface and kneed it for a few minutes again. It should not be sticky. Cut the dough into 2 equal parts. Use hands to form a long thick toll and cut it into 6 equal pieces. Each part should weigh around 50 grams. Shape the rolls by tucking the edges under to create a smooth ball-like top. Arrange the dough balls on a baking dish leaving at least one inch in between.
- The second rise - cover the rolls again and let them raise a second time in a warm place for another 20 minutes. Meanwhile, preheat the oven to 425°F.
- Bake - place the rolls on the center rack and bake for about 20-25 minutes until the rolls rise and the tops become golden brown.
Note: I used a large and deep baking dish (13x9x2.5) to perfectly fit all 12 rolls. You can also use a cake tin or any other deep baking dish. If they do not fit at once, place the uncooked buns in the fridge while you bake the first batch,
- Make garlic oil - while the rolls are baking, peel and dice the garlic finely. You can also use a garlic press. Chop the dill. In a small bowl, add olive oil, dill, garlic, and a few pinches of salt. Stir to combine.
- Brush - take ready pampushky out of the oven and brush with garlic and herb sauce on top while they are still hot. The more the better. Serve hot or cover with foil to cool them down slowly and absorb the garlic and oils.
Recipe tips
- use high-quality bread flour
- make sure to activate the yeast in warm milk. Better to check the temperature with the thermometer.
- you might need less or more flour (probably less) depending on how you measure ingredients and the brand of flour.
- important: do not add too much flour. Add it gradually until a sticky dough appears.
- if your home is too cold, turn on the oven while the dough is rising.
- for the extra golden crust, whisk one egg yolk with a tablespoon of water and brush the tops before baking.
- do not leave the prepared dough at room temperature for longer than 2 hours.
- make it ahead: after the first rise, form a bowl and lightly grease it with olive oil. Cover it tightly in plastic wrap and store in the fridge until ready to bake for no longer than 48 hours.
The science of the perfect crumb
Why do we keep the dough sticky?
High hydration is the key to a soft, airy pampushkas. When the dough is tacky or sticky, it means there is more water available to turn in to steam during baking. As the oven heat hits the rolls, the water evaporated and expands air pockets created by the yeast. If you add too much flour, the dough becomes heavy and tight, resulting in denser, bread-like texture instead of a light and pillowy one.
W\The Science: Why do we keep the dough sticky? The Why: High hydration is the key to a soft, airy pampushka. When the dough is "tacky" or sticky, it means there is more water available to turn into steam during baking. As the oven heat hits the rolls, that water evaporates and expands the air pockets created by the yeast. If you add too much flour, the dough becomes heavy and "tight," preventing that dramatic rise and resulting in a dense, bread-like texture instead of a light, pillowy one.
How to store and reheat
Pampushky without the garlic and herb mix will stay fresh in an airtight container on a counter for up to 3-4 days.
With oil and garlic, store them in in the fridge for up to 5 days.
The buns taste great cold even the next day. But for best results warm them up in the oven.
Other Ukrainian recipes
- Ukrainian Green Borscht Recipe
- Ukrainian Easter Paska bread
- Ukrainian banosh
- Beetroot and Potato Salad
- Lazy Cabbage Rolls
- Fruit Kompot Drink
- Ukrainian latkes
📖 Recipe
Ukrainian Pampushky
Equipment
- 1 kitchen scale preferable, use measuring cups instead
- 1 Measuring Cup
- 1 medium bowl
- 1 large bowl
- 1 large baking dish (13x9x2.5)
Ingredients
- 450 grams bread flour (approximately 2¾ cups)
- 1 packet dry yeast (around 2¼ teaspoons)
- 250 milliliters milk (one full measuring cup)
- 1 Tablespoon sugar (if you like sweet bread add extra spoon)
- 1 egg
- 1 teaspoon salt
- 2 Tablespoons Olive oil plus some for greasing the bowl
Garlic and herb sauce
- 3 Tablespoons olive oil
- 3 whole garlic cloves
- 2-3 Tablespoons chopped dill
Instructions
- Warm up the milk in the microwave for about 30 seconds. 100°F-110°F is ideal temperature for active dry yeast.
- In a medium bowl, add warm milk and and sugar. Stir to dissolve the sugar. Sprinkle the packet of yeast on top. Leave for 10 minutes until the bubbles appear on top. The yeast is active.
- Stir the mixture briefly with the fork. Now, add beaten egg and salt. Stir again to combine.
- Gradually, start adding the flour. Stir it in with a wooden or silicone spatula. Once it is hard to stir with the spatula, take it out and add 2 Tablespoons of olive oil and fold it into the daugh. You may need more or less flour as stated in the recipe card. Most important not to add to much - the dough need to be sticky, not stiff.
- Wash and dry hands. Transfer the sticky dough on a well-floured surface and start kneading. Knead for 3-4 minutes. It should remain sticky but not runny to from a ball that will flatten once placed on the surface. You may sprinkle more flour on top if needed and knead for another few minutes.
- Grease hands with olive oil and form a bowl. Place it in the slightly greased large bowl. Cover it with kitchen towel and let it rise at room or better warm temperature for one hour. The dough should more than double in size.
- After it rises, transfer it on the clean working surface and knead it again for another minute or two. The dough should not be sticky, but soft and easy to work with.
- Cut the dough into two equal parts. Use hands to form two rolls. Cut each roll into 6 equal pieces (about 50 grams each).
- Preheat the oven to 425°F. Slightly grease deep baking dish.
- Form the rolls by tucking the edges under and making the top smooth and round. Arrange the rolls in a baking dish, at least 1 inch apart.
- Cover with the towel and let them rise again for 20 minutes.
- Bake for 20-25 minutes or until the tops are golden brown.
- Brush with garlic and herb sauce as soon as you take them out off the oven while they are still hot. Enjoy!
Garlic and herb sauce
- While the buns are baking, chop fresh garlic and dill finely.
- In a small bowl, add olive oil, garlic, dill and few pinches of salt (optional). Mix with the fork to combine. Use the sauce to cover the hot rolls or as a dip.
Notes
- use bread flour for best results.
- you may need more or less flour depending on the brand of flour and how you measure the ingredients.
- the dough needs to be sticky, do not add too much flour. After it rises first time, it will be not sticky.
- nutritional facts are for information purposes only, and not to be considered medical advice.
Brian Coyle says
Made them this morning. Managed to keep the dough sticky without getting it stick on the utensils,the bowl or the kneading surface. They turned out brilliantly delicious. Can’t leave them alone. Definitely going to do some over Christmas✨✨👍❤️🍾🥃
Nataliia says
I am so so happy to hear you loved the recipe and will be making them again for Christmas. Thank you so much your for your review, it really made my day.